Have a look: on this finished sample, that's an 11-stitch stretch between the two purple color-patterns, and the floats run the entire 11 stitches!
 |
| (Yellow marks the center column of the run between the color-patterns. This become important when we get to the instructions) |
In technical terms, STUART is a form of ladderback jacquard--have a look at the back--see that ladder?
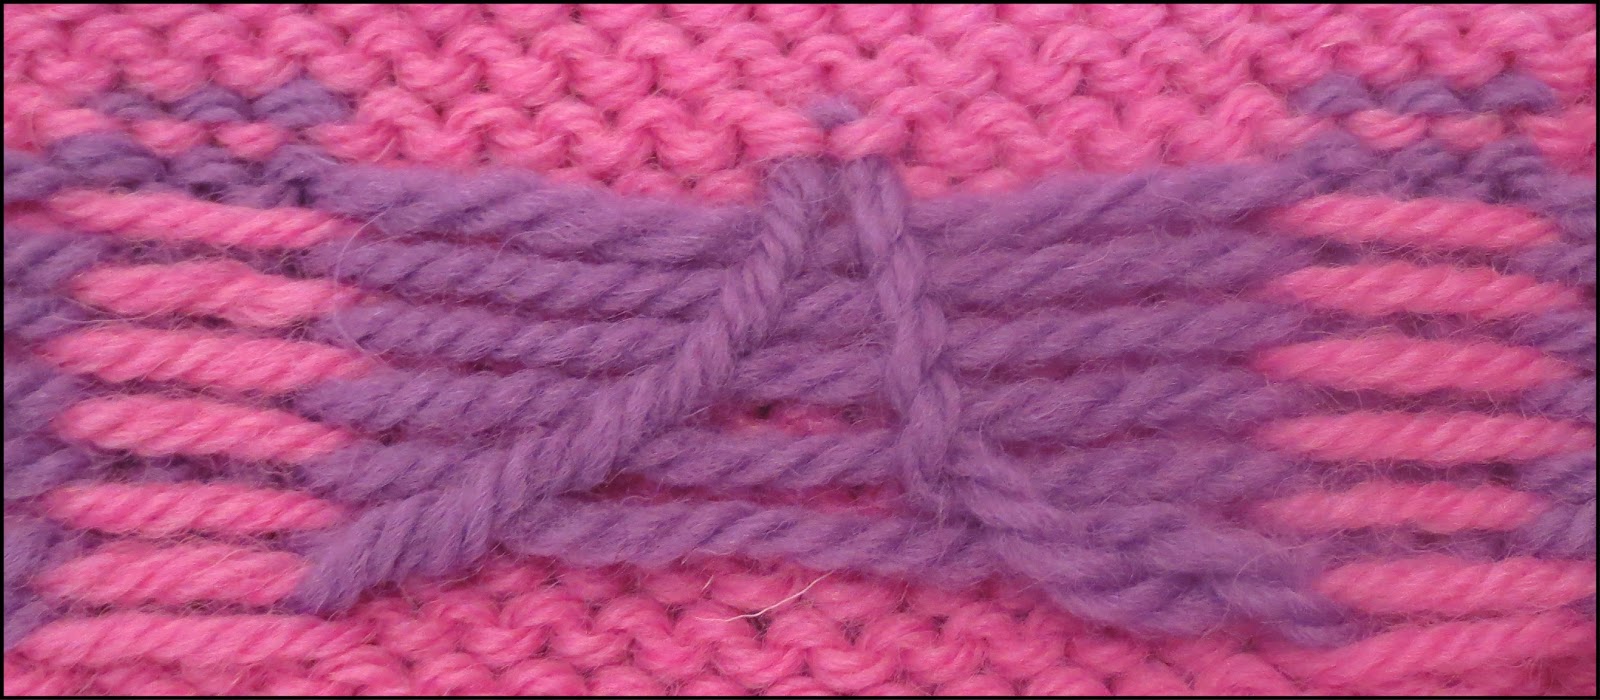 |
| The back fabric face: in STUART, the purple floats are formed into a ladderback. |
Yet, fear not. This is not a trick for "trapping long floats," or "tacking long floats" via twisting, nor is it a trick for knitting the back at the same time as the front via dk standing (double knitting stranding). STUART is much easier method, nowhere near as complicated as actual ladderback jacquard, and don't let the fancy ladderback look fool you either. This is going to be a piece of cake.
Background: Ladderback jacquard
When I first started trying to figure out extra-long carries in color knitting, I examined many commercial knits for clues. If you've ever looked at the back of a commercial color-knit, you may have noticed that the color(s) not in use are hooked up in ladders running up the fabric-back. This method is called "ladderback jacquard." Ladderback jacquard is a version of double knitting, but not at a 1:1 ratio. In short, the yarn in the front is knit at the regular rate, while the yarns stranded across the back are worked only in certain widely-spaced columns: this accounts for the appearance of the ladders.
If you are interested in the specific details, please let me direct you to a beautifully illustrated tutorial by fiber-artist Lorna Hamilton-Brown showing how to work this technique on a home knitting machine.
But oh boy! As clever as all of this is, it hurts my brain to think about translating this method to a hand-knitting version. No doubt some super-clever knitter will work out how to tame long floats via double knitting at different frequencies, but that person will not be me. I am WAY too lazy and the idea is WAY too complicated. The STUART method introduced today is inspired by the ladders on the backs of commercial knits, it is a form of ladderback jacquard, but believe me when I tell you that in STUART, the ladderbacks are worked by a much easier and very different method. SO.much.easier.
The STUART method of ladderback jacquard
STUART stands for Slip, Then Unhook And Rehook Twice. The slipping parks the middle of a long float on the fabric surface in a "catchment column," interrupting the long float into shorter floats during the knitting process. The unhooking releases the float from its parked position, returning the floats to their original length. The unhooking action is nothing other than letting out a ladder, as you would do to correct an error in the rows below. The re-hooking is done twice, once to fasten up the let-out ladder of the catchment column, and once on the back face of the fabric where fastens the very long floats into a loose sort of ladder on the back.Before we get to the illustrated step-by-step, however, I want to be clear about when it is best to work the STUART trick. STUART is a form of two-color knitting, best worked in the round. I work this (as I work all two-color-knitting) by the "two-handed" method. The sample which illustrates this post is part of a tube I knit, and the illustrations show only a small portion of the tube--a bit more than one repeat. Although not shown on the illustration, there were several repeats worked: in this way, the yarn was carried all the way around the tube. This particular pattern is a repeat of 14 stitches worked over 7 rounds in height.
OK, now we're ready for the step-by step:
Slipping, Then Unhooking And Rehooking Twice.
Step-by-step
SLIPPING:The trick to knitting STUART is that each long float is reduced to a very manageable length: 5 stitches long. In this, it follows the "rules" of how far to carrying yarn in two-color knitting. (Long story short: floats longer than 5 stitches--maybe 6 at the outside--suffer from, among other things, tension problems. The long loops on the inside also tend to catch on fingers, toes and noses, creating puckers.)
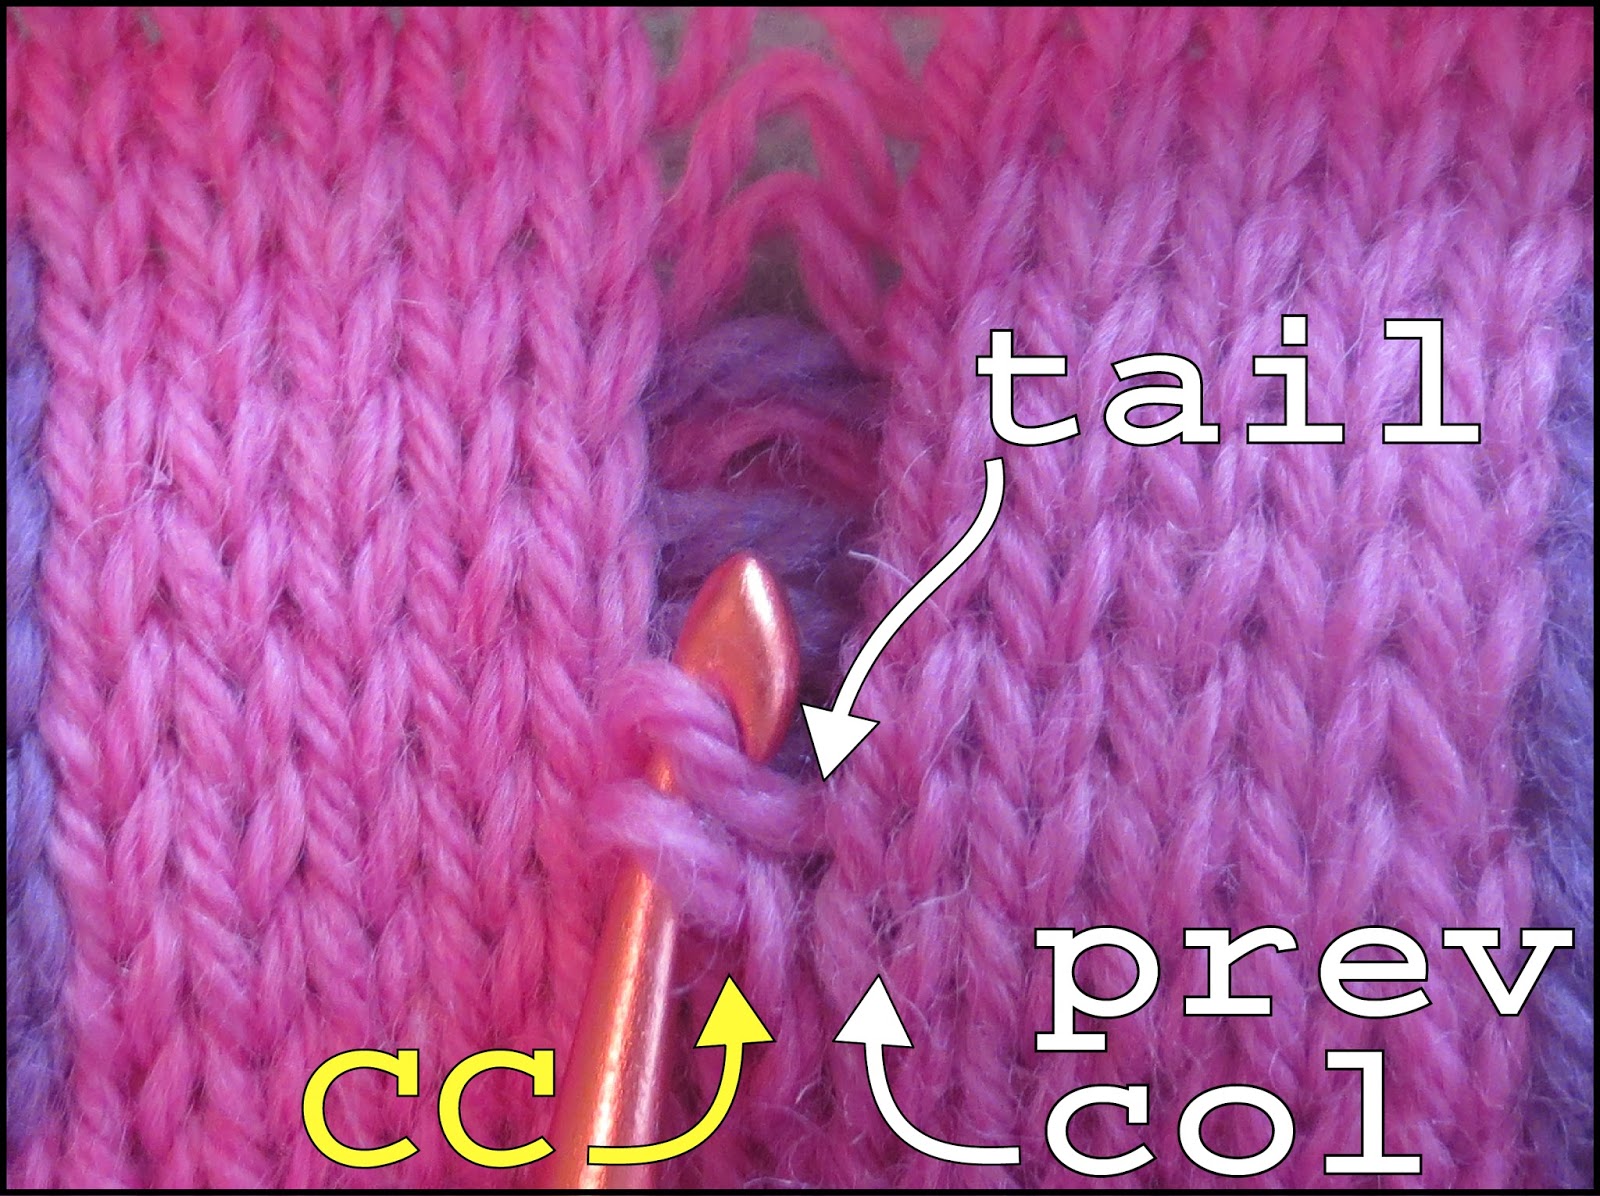
With STUART, after the 5th stitch, the float is interrupted by being parked on the fabric surface. Note that the carry-yarn is not knit, and it is not twisted, either. Instead, it is slipped into a temporary position in front of a column called the "catchment column." In this case, we'll use the center column of the 11-stitch run as the catchment column--that would be sixth stitch (the column marked in yellow on the opening photo). Slipping over the catchment column is the first step in the STUART method, the "S."
How this is worked is simple. You would knit the three purple stitches of the bar. Next, you knit 5 stitches of pink background fabric, carrying the purple yarn loosely across the back. This is ordinary two color knitting. Now we are at the catchment column, column 6, and ready to slip the purple yarn to the fabric front. The slipping itself is a three-part process.
- Before knitting the pink stitch in the catchment column ("cc") you bring the purple yarn forward.
- Next, knit the pink stitch.
- Finally, bring the purple yarn to the back.
Here are the three parts, illustrated:
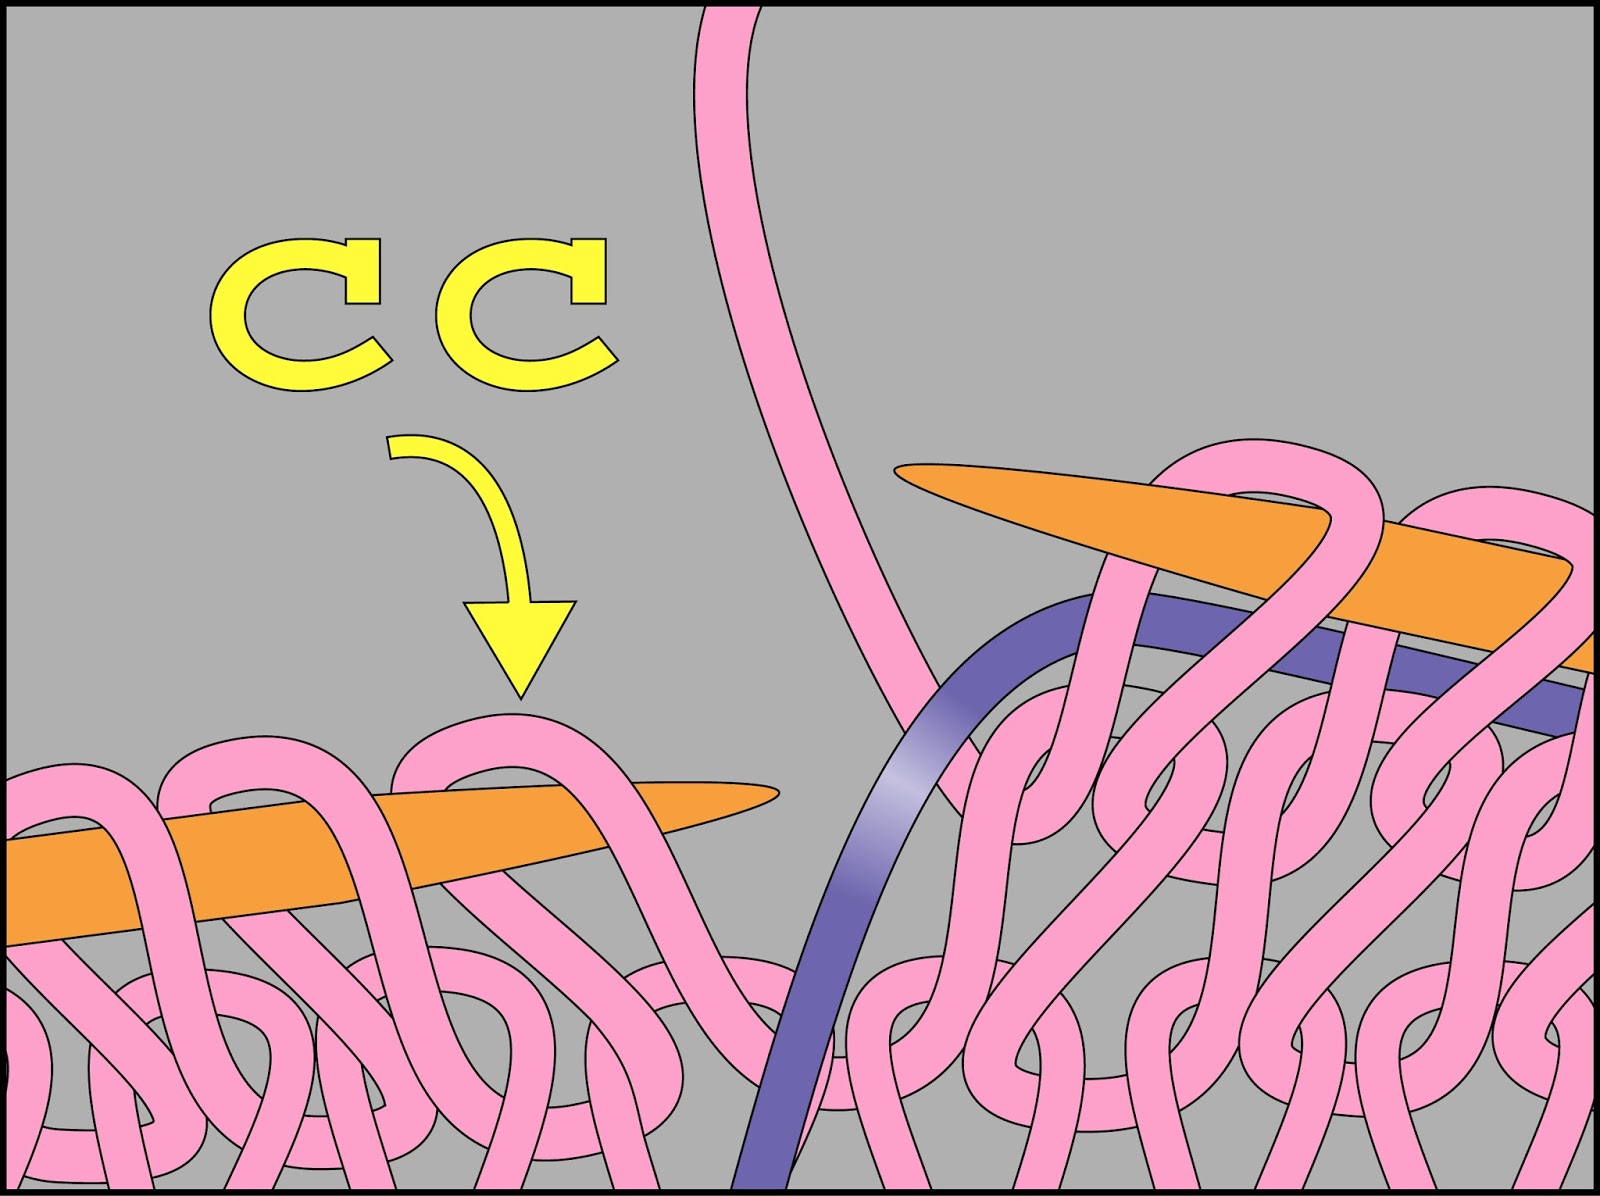 |
| 1. Before knitting the catchment column (CC), the purple yarn is brought forward |
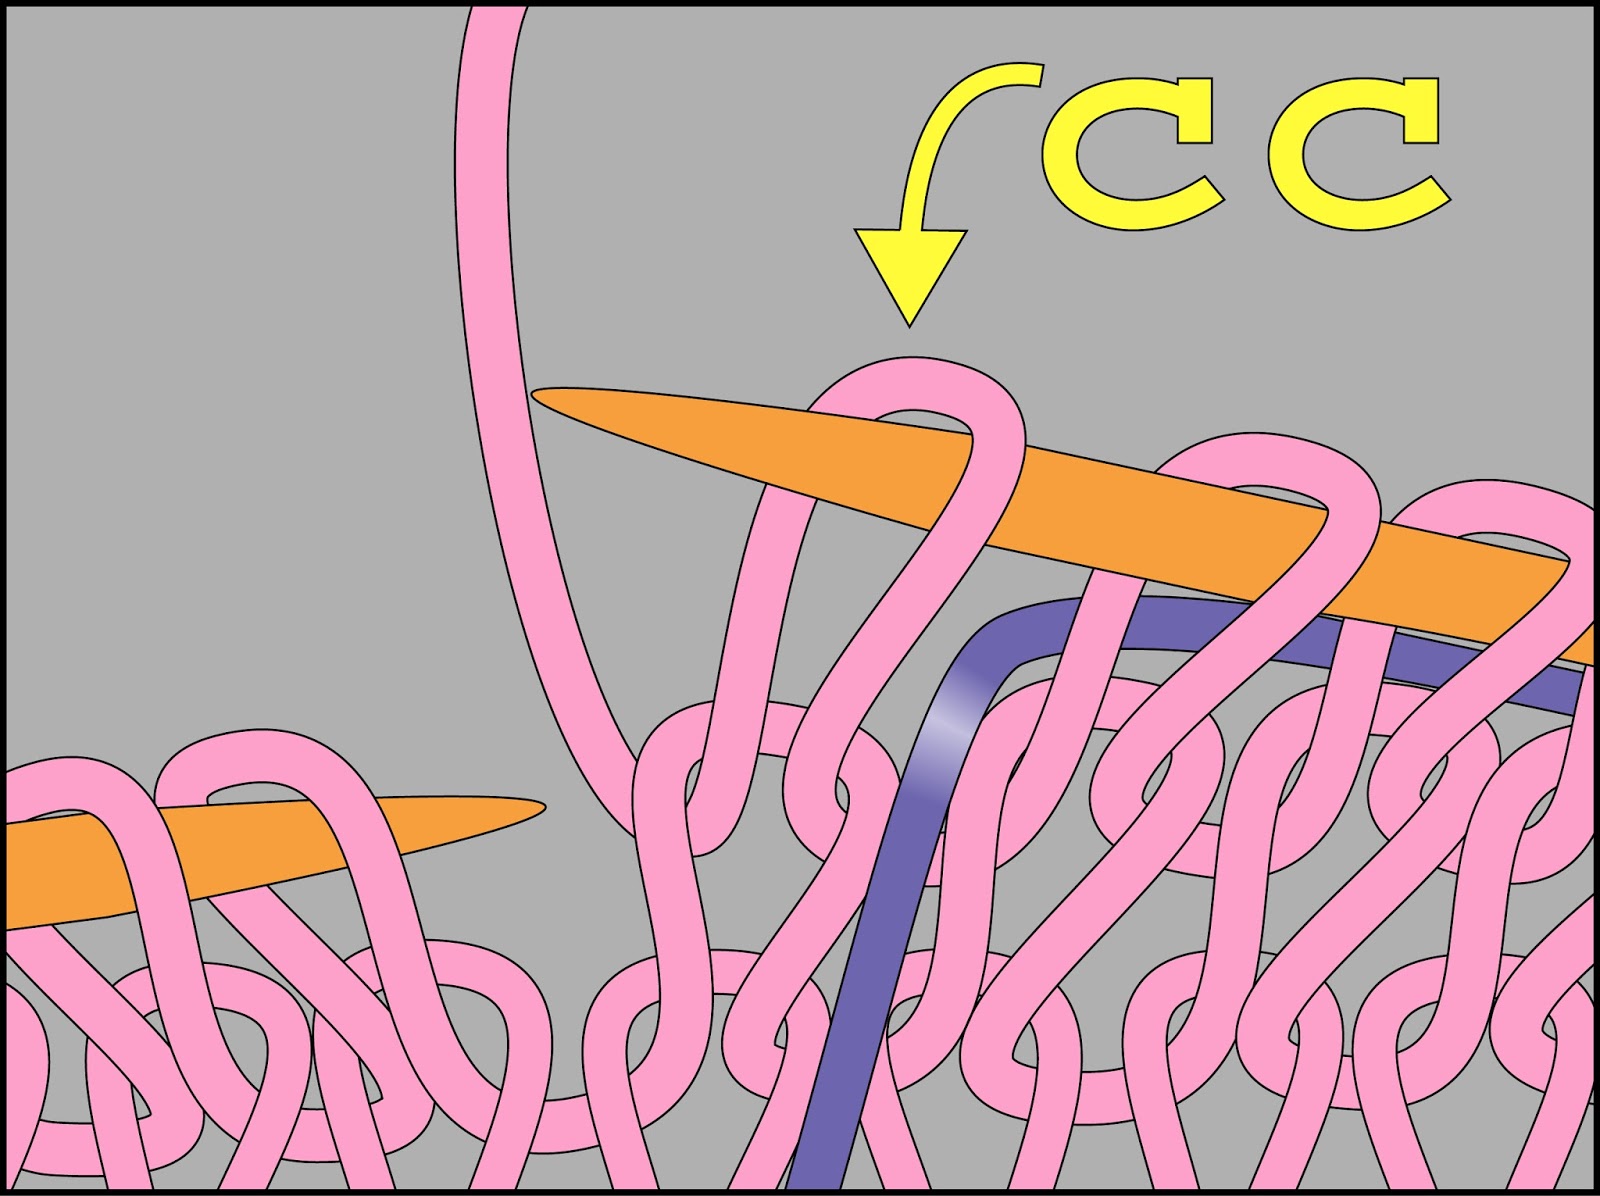 |
| 2. The catchment column (CC) is knitted |
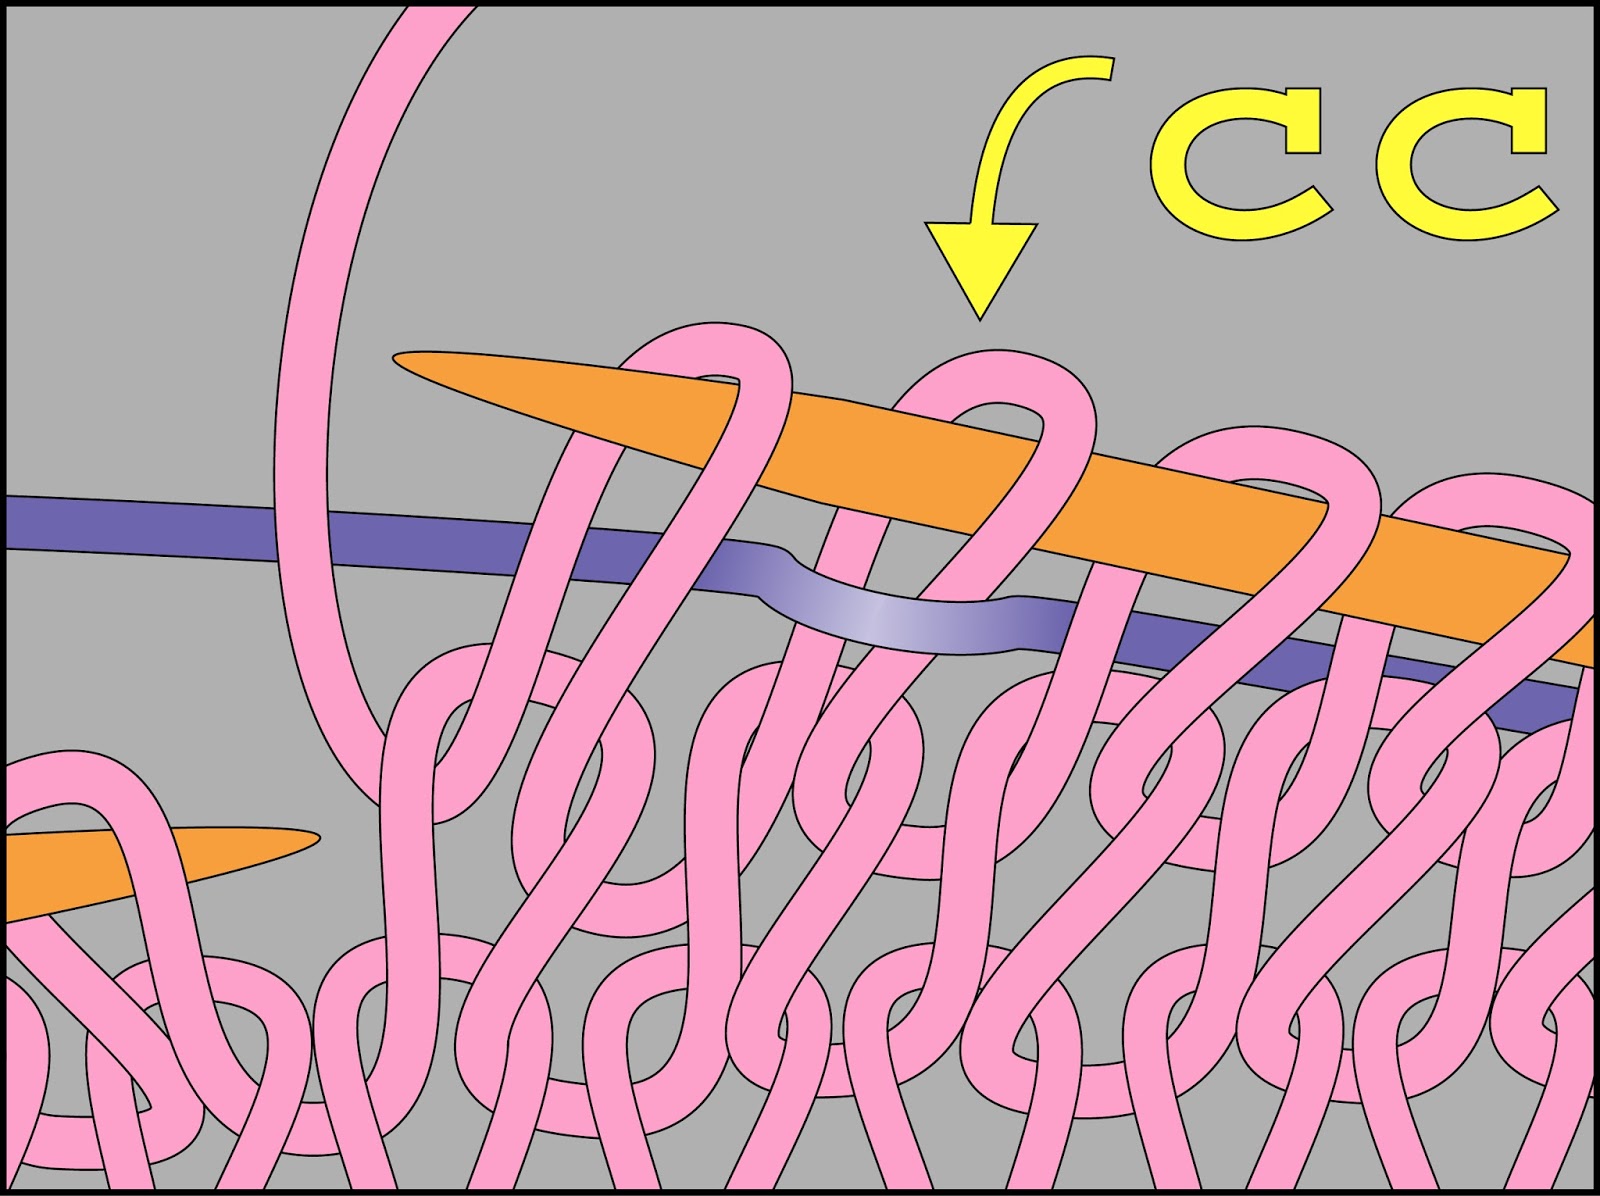 |
| 3. Purple yarn is brought to the back, then the next stitch is knitted. The purple yarn has been slipped over the catchment column (CC), leaving a "blip" on the front fabric face. |
What you have done is to slip the purple yarn from the fabric-back to the fabric-front before the catchment column--column 6--and then slip it again to return it to the back after the catchment column, with the end result that the purple yarn is slipped around the catchment column. To be sure you did it right, tug a little on the purple yarn, it should slide through the fabric freely.
After the catchment-column slip, work 5 additional stitches in pink, continuing to carry the purple yarn rather loosely as a float in the back. Finally, begin the next pattern repeat by working the three stitches of the next purple bar.
When you've worked in this manner for the entire height of the color pattern (in this case, the seven rounds of the purple rectangle), the seven slips will have made seven blips in the catchment column. Again, there will be one blip for each row of the color pattern, as you can see on the first picture below.
 |
| Each float between color-patterns is parked on the fabric-front in the middle of its too-long run. This creates one blip in the catchment column (CC) for each row of the color pattern: 7 rows of color pattern=7 rows of slipping =7 blips in the CC. |
 |
| This is what the work looks like from the back. Each of the seven 11-stitch-long floats has been interrupted by the catchment column, and in this way, each float has been broken up into very manageable 5-stitch lengths |
As for the correct tension, you will soon figure out the tension required: if you have doubts, you can adjust the tension by stretching the fabric out, then releasing it, just before you end the float by knitting the first stitch of the upcoming purple rectangle--this is a good way to be sure the purple floats contain enough slack where they won't pucker when the fabric is stretched. Note that the carried purple yarn-float will easily slip through the fabric and right through the catchment column at any point before you end the float : the float is loosely slipped through the fabric: it is neither twisted nor knit into place.
...THEN UNHOOK...
In this particular case, the color-pattern is quite simple: rectangular purple bars on a pink background. Therefore, for ease of handling and illustration, I chose to work a few pink rounds past the top of the purple bars.
This brings us to the unhooking stage, the "U" in STUART. The idea here is to unhook the catchment column, thus releasing the floats parked on the fabric face. In other words, by dropping the pink stitches of the catchment column (cc) the purple blips is released from where they were slipped onto the fabric face. Below is a photo of the fabric front after the catchment column has been unhooked. Note how, within the dropped column, the purple loops are in front.
 |
| The catchment column (cc) has been run down in a ladder which stops at the row where the bottom of the color pattern starts. This releases all the parked floats. |
...AND REHOOK TWICE...
The rehooking step actually has three parts: one in the catchment column, one to create the ladderback and one to permanently fasten the ladderback to the back fabric-face.
Catchment column: In this next photo, I have begun the process of latching up the catchment column. This is done in the usual way for re-hooking a let-out column. Specifically, you insert a crochet hook into the bottom loop, then re-hook each ladder-rung in turn.
Do you wonder why the pink ladder-rungs are not in sight? In this case, the purple floats are in front because you originally knit the work that way, with the pink yarn behind the purple in the catchment column. Letting out the pink column does not disturb this arrangement, so the purple floats remain in front, initially.
Since you need to relatch the pink, which is behind at this point, you must carefully reach behind each purple loop in turn, to find the correct pink ladder-rung to hook up next. The easiest way to find the right rung is to locate the "tail" of neighboring stitch in the previous column (the one before the catchment column, in this case, column 5). Tracing the tail leading from the bottom of that stitch will always lead you to the correct pink ladder-run in the correct sequence. You can clearly see the tail/ladder rung hooked over the crochet hook in the below illustration.
 |
| I am rehooking the catchment column using a crochet hook. I find the correct pink ladder-rung to hook up next, by tracing the tail of the stitch in the previous column. |
You pause the catchment column re-latching when you get to the row in which the color pattern stops. In this sample, pause the re-latch on row 7, as shown below. (You'll know you're pausing in the correct row, because there will no longer be purple floats hiding the pink ladder-rungs.)
 |
| The rehooking pauses at the top of the color-pattern, in this case, row 7. |
Once your each the pausing spot, remove the crochet hook, insert a stitch-holder (a bobby-pin or a safety pin works well) and flip the work over so the back fabric face is showing. You are now ready to do the second part of the "R" (rehooking) step--hooking up the floats into a ladderback.
Ladderback: On the fabric back, you will see the released floats--in our sample, they are 11 stitches long: certainly too long and loose to be left that way.
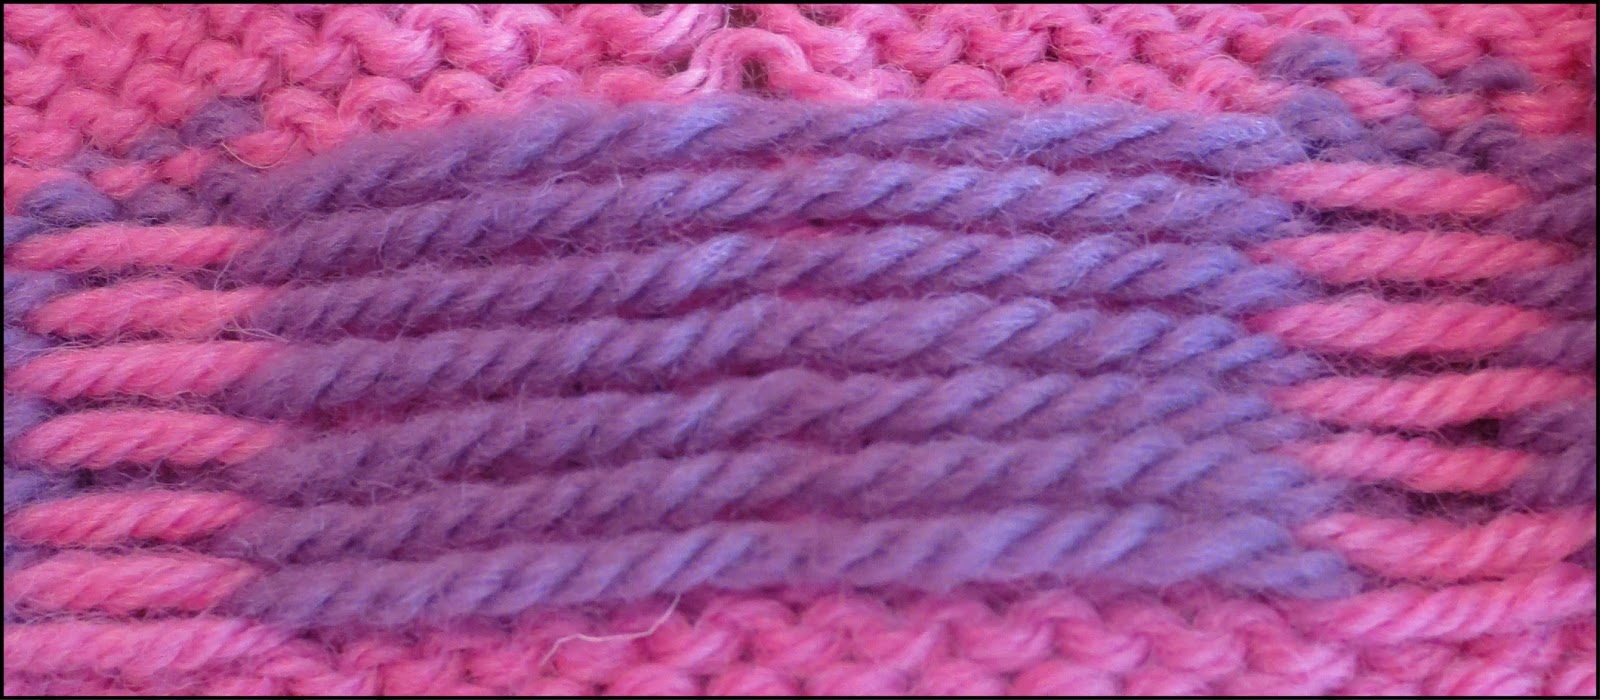 |
| The released floats are 11-stitches long--too long and loose to be left that way. |
To begin the ladderback, simply insert the crochet hook under the bottom float and catch the second float with the hook-end of your crochet hook. Draw the loaded hook out from under the first strand. This forms a loose loop over the barrel of the crochet hook. Next, insert the hook under the next float up, then draw that float through the loop on the barrel. Continue in this manner. The photo below shows the fifth float looped up around the barrel of the crochet hook and the sixth float about to be drawn through.
 |
| Using a crochet hook to create the ladderback from the released floats |
Continue in this manner until you get to the top of the purple floats. You'll have a roughly triangular ladderback, as shown below.
 |
| All the floats have been caught into the ladderback: the ladderback forms a loose triangle |
It is now time to fasten the ladderback to the back face of the fabric so that it remains in place throughout future wearing. Remove the crochet hook from the top of the ladderback and insert a bobby-pin or safety pin to prevent an inadvertent run-out. Flip the work over again so the front is showing. You are now ready to fasten the top of the ladderback to the back face of the fabric.
Fasten the ladderback to the back fabric-face: This is the last part of the rehooking step. It stabilizes the top of the ladderback by preventing it from shifting either horizontally or vertically.
Working from the front, remove the bobby-pin holding the loop at the top of the catchment column and re-insert your crochet hook into that top loop (marked "X" on the illustration below). Next, remove the bobby-pin holding the top loop of the ladderback, and insert the hook into that top loop (marked "Y"). Finally, grab the next rung of the pink ladder in the catchment column (marked "Z"). Draw the rung (Z) through both top-loops (Y and X). This fastens the top of the ladderback to the back face of the fabric.
 |
| Draw the pink rung Z through the top-loops of ladderback and the catchment column (loops Y and X, respectively). This fastens the ladderback to the back face of the fabric. |
Finish by latching up all the pink ladders remaining above the catchment column. The below illustration shows the final result, as seen from the back face of the fabric. You can see the top of the triangular ladder, marked "Y," is permanently fastened to the fabric back. As luck has it, the purple top of the ladderback basically does not show, not even when the fabric is stretched. This is partly because the purple loop is entirely behind the pink stitch, and partly because the loose nature of the ladderback allows the purple yarn to stretch without forming any sort of pucker.
 |
| The top of the ladderback has been permanently fastened to the back face of the fabric. |
Finally, the last photo, below, shows what the front looks like before blocking--the yellow arrow marked the bottom of the column, the yellow asterisk marks the top. As you see, even before blocking, the tension is really not too bad. This is because the slipped purple yarn takes up very little space between the pink stitches, so when the catchment column was knit, it had the correct amount of yarn already in it. Stated otherwise, there is very, very little slack knit into the catchment column, because the slipped purple yarn does not, in any practical sense, "take up room" between the catchment-column stitches and its neighbors. (This is the same reason why I recommend using scrap yarn as stitch markers rather than a hard ring of any sort.) When the catchment column is unhooked and re-hooked, there is very little distortion from extra slack.
 |
| The catchment column all latched up: even before blocking, the distortion really isn't too bad! |
By the way: through lucky coincidence, the amount of slack which slipping adds to the floats provides just the right amount of extra yarn to create the ladderback out of the floats, without causing any puckering!
FINAL POINT: Where to start the rehooking process.
So, where do you actually start the unhooking process? The sample color-pattern is very short and very regular. If you had a more complicated pattern--especially one where the future rounds will create color patterns overlapping the catchment column, you'd want to work the unhooking step immediately after the end of each color pattern. In other words, drop the catchment column when it is easiest to undo: do not wait until you'd have to drop through a different pattern first.
Another thing to think about: this sample is geometric, very regular. However, if you are knitting an irregular shape, you might have several rows with very long floats, followed by rows with much shorter floats. In this case, you'd stop the catchment column and work the "unhook" step at the point in your pattern where the float is no longer "too long." In other words, once the color-pattern you are knitting has the float come back down to something more reasonable for a regular float (5 stitches, say) then you no longer need to break up the float. It is at this point in your knitting that you'd unhook/rehook.
Bottom line: unhooking and re-hooking is a "finishing" process yes, but, unless the catchment column runs the entire length of your project, you do not wait until project-end to to unhook and re-hook. Rather, work the "UART" part of STUART as-you go: at the top of each catchment column as dictated by your color-patterns.
* * *
 To see STUART in action on a project, go to the next post in this series: STUART ladderback jacquard gallery, part 1: Skeleton hat "Round Dance."
At left is a little preview of the STUART project featured there.
There is a third post in this series also, called Long floats in color-knitting: Modifying STUART ladderback jacquard for rough-use situations.
--TK
You have been reading TECHknitting blog on STUART: a substitute easier method for
tacking long floats or
trapping long floats or
double knit stranding floats