 |
| Undulation Rib scarf, pinstriped with metallic gold yarn |
The second part of today's post is an optional method for creating purl ribs after-the-fact via a trick called "controlled-drop conversion."
If this project grabs you, you can completely ignore the second half of this post and still wind up with a very pretty undulation-rib pinstriped scarf. However, for maximum entertainment value from your skein of yarn, you might like to mess around with my optional trick, or at least try it over a few rows of your project.
PART 1: The pattern for an undulation-rib pinstriped scarf
Materials:- Scrap amount of waste yarn in the same weight as the main yarn.
- A ball or two of yarn in the main color (amount of yarn depends on how long you want the scarf to be). This scarf--a bit over five feet long--used an entire skein of Cascade 220 yarn.
- A ball of contrast color yarn in the same weight as the main yarn, this is used for the pinstriping. I used a metallic gold yarn which had been in stash so long that the band fell off. It was a 3.5 ounce ball, though, and I used most of it. Alternatively, you can use a skein of fingering weight yarn, held doubled.
- Knitting needles in the size you usually use to knit the main yarn (called "larger needles" in below pattern).
- Knitting needles two or three sizes smaller than the larger needles.
- Crochet hook in a size equivalent to the larger needles. (At least, start the pinstriping with an equivalent size hook, moving to a larger or smaller hook depending on the results you are getting.)
Note 1: The instructions below incorporate a slip stitch side-edging which creates a pleasant “chained” selvedge. This accounts for two stitches of the side-edging stitch count.
Note 2: You can also make the scarf wider or narrower--the edging on both sides takes up 10 stitches, while repeating part of the pattern is in chunks of 8 stitches, so add or subtract stitches in 8-stitch chunks: the pattern as written allows for knitting a fabric in any width starting from a minimum of 26 sts, which is two 8-st chunks + 10 edging stitches. (For further explanation of this sort of "X plus Y" notation, check out this post.) Further down in this post, I show a sample of a skinnier scarf worked on a 34 st cast on.
Note 3: The top and bottom edging is centered in the width of the scarf. Centering the undulation rib pattern on the edging requires both first and last pattern repeat to be cut short. Therefore, the scarf begins on a row 5. After this first partial repeat (row 5-28), you would start again with row 1. After working as many repeats as you like of rows 1-28, finish the scarf with another partial repeat, this time, by ending on a row 19. In this manner, the pattern and top/bottom edging are centered on the scarf and on each other.
Undulation rib
Chart: Here is a chart. The written directions are below. Clicking on the chart makes it much larger, in its own browser window and printable.
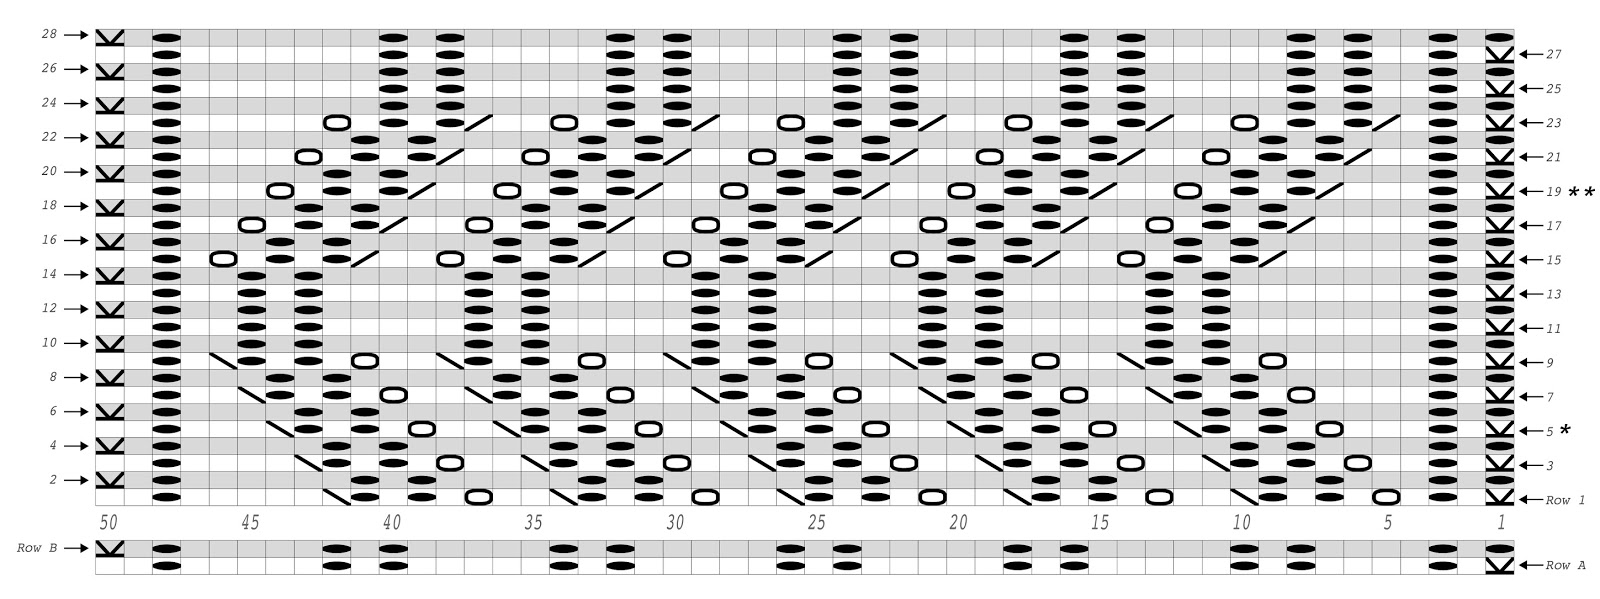 |
| Chart for undulation rib scarf |
Below is the stitch key.

Written directions:
Using waste yarn, smaller needles and any cast on method you prefer, CO 50 sts. Work several rows. Switch to main yarn.
Foundation row: purl all sts
Edging row A: Slip first st purlwise, k1, p1, k4, *p1, k1, p1, k5, repeat from * until 3 sts remain on row, p1, k2
Edging row B: slip first st purlwise, p1, k1, p5,*k1, p1, k1, p5, repeat from * until within 10 sts of end of row, k1, p1, k1, p4, k1, p1, k1.
Repeat edging rows A and B twice more for a total of 7 rows worked in main color yarn.
Switch to larger needles.
Row 2: slip first st purlwise, p1, k1, p6,*k1, p1, k1, p5, repeat from * until 9 sts remain at end of row, k1, p1, k1, p3, k1, p1, k1.
Row 3: slip first st purlwise, k1, p1, k2 *yo, k1, p1, k1, p1, SYTK, k2, repeat from * until 5 sts remain at end of row, k2, p1, k2.
Row 4: slip first st purlwise, p1, k1, p5,*k1, p1, k1, p5, repeat from * until 10 sts remain at end of row, k1, p1, k1, p4, k1, p1, k1.
Row 5: (This is the row on which to begin the scarf, after you have worked the foundation rows) slip first st purlwise, k1, p1, k3 *yo, k1, p1, k1, p1, SYTK, k2, repeat from * until 4 sts remain at end of row, k1, p1, k2.
Row 6: slip first st purlwise, p1, k1, p4, *k1, p1, k1, p5 until 3 sts remain at end of row, k1, p1, k1
Row 7: slip first st purlwise, k1, p1, k4, *yo, k1, p1, k1, p1, SYTK, k2, repeat from * until 3 sts remain at end of row, p1, k2.
Row 8: slip first st purlwise, p1, k1, p3, *k1, p1, k1, p5, repeat from * until 4 sts remain at end of row, p1, k1, p1, k1.
Row 9: slip first st purlwise, k1, p1, k5, *yo, k1, p1, k1, p1, SYTK, k2, repeat from * until 10 sts remain at end of row, yo, k1, p1, k1, p1, SYTK, k1, p1, k2 .
Row 10: slip first st purlwise, p1, k1, p2, *k1, p1, k1, p5, repeat from * until 5 sts remain at end of row, p2, k1, p1, k1.
Row 11: slip first st purlwise, k1, p1, k7, *p1, k1, p1, k5, repeat from * until 8 sts remain at end of row, p1, k1, p1, k2, p1, k2.
Row 12: slip first st purlwise, p1, k1, p2, *k1, p1, k1, p5, repeat from * until 5 sts remain at end of row, p2, k1, p1, k1.
Row 13: slip first st purlwise, k1, p1, k7, *p1, k1, p1, k5, repeat from * until 8 sts of end remain at end of row, p1, k1, p1, k2, p1, k2.
Row 14: slip first st purlwise, p1, k1, p2, *k1, p1, k1, p5, repeat from * until 5 sts remain at end of row, p2, k1, p1, k1.
Row 15: slip first st purlwise, k1, p1, k5, *k2tog, p1, k1, p1, k1, yo, k2, repeat from * until 10 sts remain at end of row, k2tog, p1, k1, p1, k1, yo, k1, p1, k2
Row 16: slip first st purlwise, p1, k1, p3, *k1, p1, k1, p5, repeat from * until 4 sts remain at end of row, p1, k1, p1, k1.
Row 17: slip first st purlwise, k1, p1, k4, *k2tog, p1, k1, p1, k1, yo, k2, repeat from * until 3 sts remain at end of row, p1, k2
Row 18: slip first st purlwise, p1, k1, p4, *k1, p1, k1, p5 until 3 sts remain at end of row, k1, p1, k1
Row 19: slip first st purlwise, k1, p1, k3, *k2tog, p1, k1, p1, k1, yo, k2, repeat from * until 4 sts remain at end of row, k1, p1, k2. (At the top edge, the last repeat of the scarf is a partial one, you end the scarf by working a row 19.)
Row 20: slip first st purlwise, p1, k1, p5,*k1, p1, k1, p5, repeat from * until 10 sts remain at end of row, k1, p1, k1, p4, k1, p1, k1.
Row 21: slip first st purlwise, k1, p1, k2, *k2tog, p1, k1, p1, k1, yo, k2, repeat from * until 5 sts remain at end of row, k2, p1, k2.
Row 22: slip first st purlwise, p1, k1, p6,*k1, p1, k1, p5, repeat from * until 9 sts remain at end of row, k1, p1, k1, p3, k1, p1, k1.
Row 23: slip first st purlwise, k1, p1, k1, *k2tog, p1, k1, p1, k1, yo, k2, repeat from * until 6 sts remain at end of row, k3, p1, k2.
Row 24: slip first st purlwise, p1, k1, p7, *k1, p1, k1, p5, repeat from *until 8 sts remain at end of row, k1, p1, k1, p2, k1, p1, k1.
Row 25: slip first st purlwise, k1, p1, k2, *p1, k1, p1, k5, repeat from * until 5 sts remain at end of row, k2, p1, k2.
Row 26: slip first st purlwise, p1, k1, p7, *k1, p1, k1, p5, repeat from *until 8 sts remain at end of row, k1, p1, k1, p2, k1, p1, k1.
Row 27: slip first st purlwise, k1, p1, k2, *p1, k1, p1, k5, repeat from * until 5 sts remain at end of row, k2, p1, k2
Row 28: slip first st purlwise, p1, k1, p7, *k1, p1, k1, p5, repeat from *until 8 sts remain at end of row, k1, p1, k1, p2, k1, p1, k1
Top edging: After working a row 19, switch to smaller needles. Work edging row B, then A. Repeat B then A twice more, 6 total edging rows. Do not cut yarn
* * *
Reminder to start first go-through of scarf on row 5 (not row 1!)
* * *
Row 1: slip first st purlwise, k1, p1, k1 *yo, k1, p1, k1, p1, SYTK, k2, repeat from * until 6 sts remain at end of row, k3, p1, k2.Row 2: slip first st purlwise, p1, k1, p6,*k1, p1, k1, p5, repeat from * until 9 sts remain at end of row, k1, p1, k1, p3, k1, p1, k1.
 |
| Pretty picture: front and back of FO |
Row 4: slip first st purlwise, p1, k1, p5,*k1, p1, k1, p5, repeat from * until 10 sts remain at end of row, k1, p1, k1, p4, k1, p1, k1.
Row 5: (This is the row on which to begin the scarf, after you have worked the foundation rows) slip first st purlwise, k1, p1, k3 *yo, k1, p1, k1, p1, SYTK, k2, repeat from * until 4 sts remain at end of row, k1, p1, k2.
Row 6: slip first st purlwise, p1, k1, p4, *k1, p1, k1, p5 until 3 sts remain at end of row, k1, p1, k1
Row 7: slip first st purlwise, k1, p1, k4, *yo, k1, p1, k1, p1, SYTK, k2, repeat from * until 3 sts remain at end of row, p1, k2.
Row 8: slip first st purlwise, p1, k1, p3, *k1, p1, k1, p5, repeat from * until 4 sts remain at end of row, p1, k1, p1, k1.
Row 9: slip first st purlwise, k1, p1, k5, *yo, k1, p1, k1, p1, SYTK, k2, repeat from * until 10 sts remain at end of row, yo, k1, p1, k1, p1, SYTK, k1, p1, k2 .
Row 10: slip first st purlwise, p1, k1, p2, *k1, p1, k1, p5, repeat from * until 5 sts remain at end of row, p2, k1, p1, k1.
Row 11: slip first st purlwise, k1, p1, k7, *p1, k1, p1, k5, repeat from * until 8 sts remain at end of row, p1, k1, p1, k2, p1, k2.
Row 12: slip first st purlwise, p1, k1, p2, *k1, p1, k1, p5, repeat from * until 5 sts remain at end of row, p2, k1, p1, k1.
Row 13: slip first st purlwise, k1, p1, k7, *p1, k1, p1, k5, repeat from * until 8 sts of end remain at end of row, p1, k1, p1, k2, p1, k2.
Row 14: slip first st purlwise, p1, k1, p2, *k1, p1, k1, p5, repeat from * until 5 sts remain at end of row, p2, k1, p1, k1.
Row 15: slip first st purlwise, k1, p1, k5, *k2tog, p1, k1, p1, k1, yo, k2, repeat from * until 10 sts remain at end of row, k2tog, p1, k1, p1, k1, yo, k1, p1, k2
Row 16: slip first st purlwise, p1, k1, p3, *k1, p1, k1, p5, repeat from * until 4 sts remain at end of row, p1, k1, p1, k1.
Row 17: slip first st purlwise, k1, p1, k4, *k2tog, p1, k1, p1, k1, yo, k2, repeat from * until 3 sts remain at end of row, p1, k2
Row 18: slip first st purlwise, p1, k1, p4, *k1, p1, k1, p5 until 3 sts remain at end of row, k1, p1, k1
Row 19: slip first st purlwise, k1, p1, k3, *k2tog, p1, k1, p1, k1, yo, k2, repeat from * until 4 sts remain at end of row, k1, p1, k2. (At the top edge, the last repeat of the scarf is a partial one, you end the scarf by working a row 19.)
Row 20: slip first st purlwise, p1, k1, p5,*k1, p1, k1, p5, repeat from * until 10 sts remain at end of row, k1, p1, k1, p4, k1, p1, k1.
Row 21: slip first st purlwise, k1, p1, k2, *k2tog, p1, k1, p1, k1, yo, k2, repeat from * until 5 sts remain at end of row, k2, p1, k2.
Row 22: slip first st purlwise, p1, k1, p6,*k1, p1, k1, p5, repeat from * until 9 sts remain at end of row, k1, p1, k1, p3, k1, p1, k1.
 |
| Another pretty picture |
Row 23: slip first st purlwise, k1, p1, k1, *k2tog, p1, k1, p1, k1, yo, k2, repeat from * until 6 sts remain at end of row, k3, p1, k2.
Row 24: slip first st purlwise, p1, k1, p7, *k1, p1, k1, p5, repeat from *until 8 sts remain at end of row, k1, p1, k1, p2, k1, p1, k1.
Row 25: slip first st purlwise, k1, p1, k2, *p1, k1, p1, k5, repeat from * until 5 sts remain at end of row, k2, p1, k2.
Row 26: slip first st purlwise, p1, k1, p7, *k1, p1, k1, p5, repeat from *until 8 sts remain at end of row, k1, p1, k1, p2, k1, p1, k1.
Row 27: slip first st purlwise, k1, p1, k2, *p1, k1, p1, k5, repeat from * until 5 sts remain at end of row, k2, p1, k2
Row 28: slip first st purlwise, p1, k1, p7, *k1, p1, k1, p5, repeat from *until 8 sts remain at end of row, k1, p1, k1, p2, k1, p1, k1
Top edging: After working a row 19, switch to smaller needles. Work edging row B, then A. Repeat B then A twice more, 6 total edging rows. Do not cut yarn
Finishing bottom edge: Remove waste yarn from bottom edge, catch each stitch on a needle as the waste yarn is removed, then use reserved tail to work I-cord bind off at bottom edge so as to match top edge.
Pinstriping: Using a contrasting color yarn (I used a metallic gold which was in my stash for so long, it lost its bands), pinstripe up the purl columns, according to the instructions in this post.
Ends: As the last aspect of the finishing, the tails of the main- and pinstriping yarn are hidden in the tubes of the I-cord bind-off.
Ends: As the last aspect of the finishing, the tails of the main- and pinstriping yarn are hidden in the tubes of the I-cord bind-off.
* * *
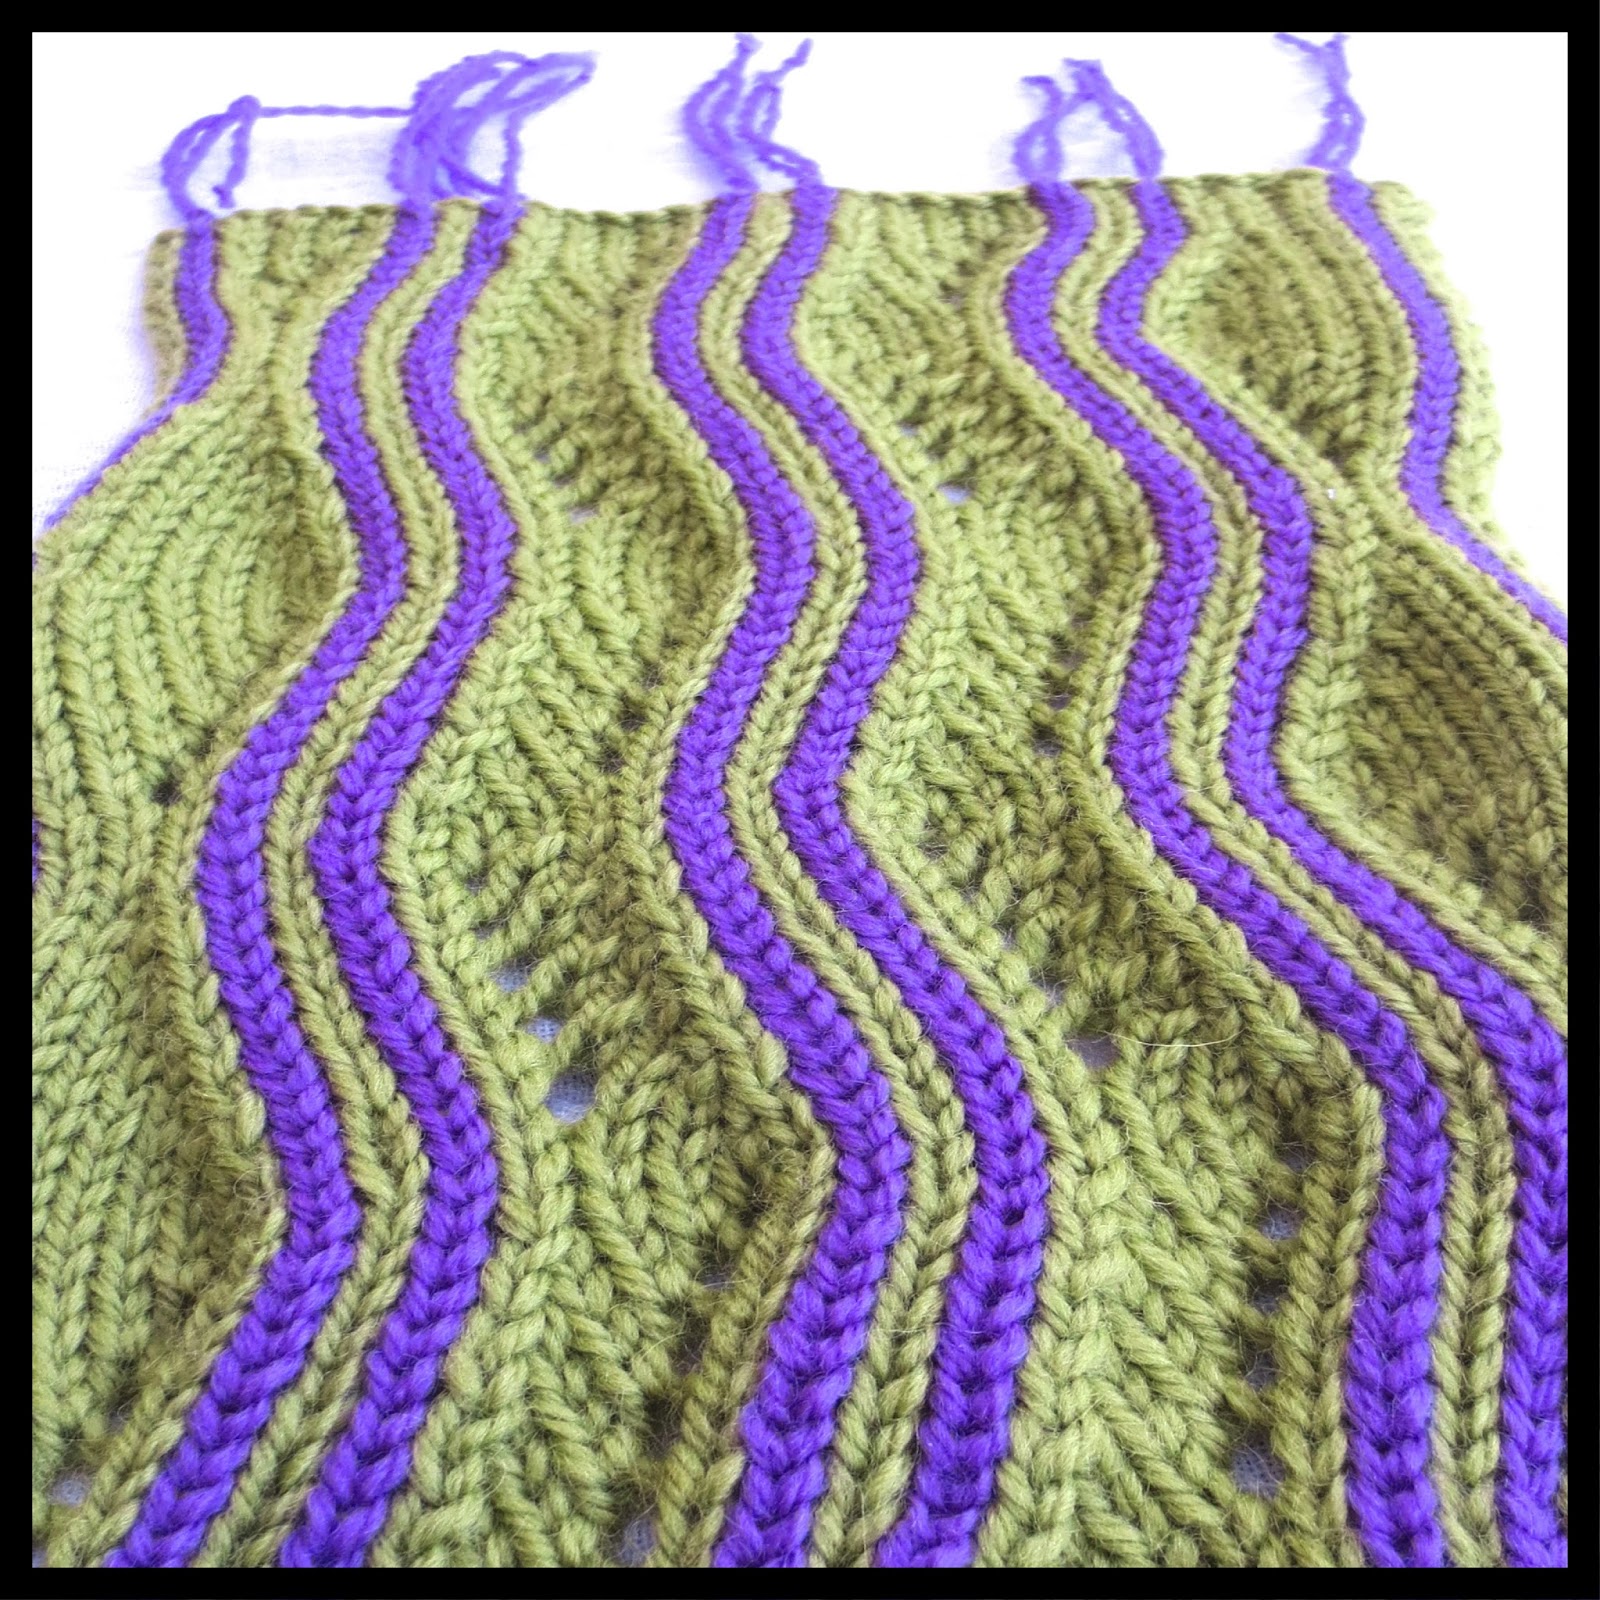 |
| skinnier... |
Change of width: this green and purple sample is skinnier than the white one, featuring only 3 repeats of the pattern (3 x 8 st + 10 edging sts) for a CO of 34 sts, whereas the white scarf features five pattern repeats (5 x 8 sts + 10 edging sts) for a CO of 50 sts.
 |
| fringes... |
This green and purple scarf is is knit from Pattons Classic, the stripes are KnitPicks Palette yarn, doubled.
The second half of this post is about yet another optional modification: another way to create the purl ribs, called "conversion." However, converting ribs is not a necessary step to making this scarf. This green and purple scarf was modified in width and in the treatment of the ends, but it was not modified as to the manner of knitting. In this version, the ribs were worked just as pattern is written/charted and, IMHO, it came out looking just fine. Here are before and after pictures of that scarf, created in the ordinary method, with the purl ribs knit in, then pinstriped over.
 |
| Before pinstriping and afterwards, scarf knitted to pattern (purl ribs worked as-you-go) |
But, well...if you've been reading this blog for any length of time at all, you know me: I think the whole POINT of knitting is messing around. So although I knit the purl columns of the green scarf in the usual manner (as the pattern is written) I knit the white and gold sample scarf via the geek-ish pattern modification discussed below, a trick called "conversion via controlled drop."
* * *
PART 2: conversion via controlled drop, a geek-ish trick for converting ribbing on a shaped fabric
This pattern features purl columns and these are highly important to the pattern: without the purl columns, the pinstriping would have nowhere to go. (OK, cue the foreshadowing music: that's actually not completely true, as a future post will one day explain. But for now, let's accept that pinstriping requires a purl column to nestle into...)
The problem is, purl columns interspersed with knit columns don't always play nice--the knit columns on the border can be messy. I have written an entire post on tricks to neaten up this transition zone, Yet, being utterly addicted to playing with my knitting, on this scarf, I messed around and used yet a different trick.
 |
| The symbol to ignore if you want to knit the ribs "blind" |
When I worked this trick, I created beautiful non-messy purl ribs by "converting" the symbolized columns worked as knits to purl ones when the work was finished--but before the I-cord edging was attached. Although the chart doesn't show it all that well, the purl columns are, in fact, continuous, so if you start off dropping the correct stitch, you're guaranteed to remain in the correct column all the way down. Purl ribs knit blind then afterwards created via conversion guarantee a very neat and tidy rib.
But wait, don't start running out whole columns just yet. Yes, normally, purl-column conversion requires that you drop a ladder down to the bottom of the fabric, then hook it all the way up again. But...this 5-repeat scarf is over 5 feet long, so that would be a giant ladder (actually, 12 giant ladders--two for each rib, and one for each border--let down one-at-a-time). Another problem with ladders is that they loosen up the fabric, and your stitches start sliding around. Not so bad in a plain-knit fabric of pure sticky wool, but THIS fabric has tons of shaping--for a lot of their journey the ladders would be only one! column! away! from yo's on the one side, or shaped decreases on the other. Even for sticky wool (I used Cascade 220 for the white scarf knit blind) taking a chance on loosening up the fabric next to **shaping** like this is a bit nuts; in any other sort of yarn, it would be insanity.
So, I pulled an even more obscure TECH-nique out of the old bag o'tricks. Rather than let down a giant runner all the way to the bottom, then latch it up, I instead worked from top to bottom, converted each column stitch-by stitch. In other words, I converted upside-down to how the fabric was knit, using a trick called "controlled drop."
Controlled drop is normally employed as a temporary solution for dropping a column in color knitting or double-knitting. Yet it has many other uses ... cue foreshadowing music again: a future post will show an amazing trick you can do with controlled drop...I'll put a link here in the fullness of time ... but for this scarf, the use we want is that controlled drop permits permanent conversion of knit columns to purl columns without ever dropping a ladder.
There's never a free lunch in knitting, and using controlled drop means each purl column is "upside down." Further, the fabric has a slightly funky top and bottom edge. Yet, in this context, no problem. In a one-color stockinette fabric (which the underlying scarf is) the upside-down-ness is virtually impossible to see, and once you work a pinstripe over the converted column, the secret is yours until the sun explodes and swallows the earth. Further, the I-cord bind off hides any edge irregularities. Here's a close-up of top and bottom, see the edges for yourself--
 |
| Top and bottom I-cord bind off: edge irregularities are hidden and a hiding-place provided for the tails left over from the pinstripes. |
* * *
Below is a series of diagrams about working controlled drop, one stitch at a time, and ending with a close-up photo of the converted ribs, but first, one final note.Many of the below illustrations show the fabric as seen from the PURL SIDE. Just to confuse you, we ARE making purl ribs, yes, but the reality of controlled-drop conversion is that it's easiest to make KNIT ribs on a PURL background.
As the Zen masters say, "what has a front has a back," and the back of knit is purl. So, even though the point of this exercise is to make PURL ribs on a KNIT background, working this controlled-drop conversion is actually performed by making KNIT ribs on a PURL background. It all comes out right in the end, however.
 |
| The fabric as seen from the purl side. The column we are going to drop is marked at the top in red and gold. |
Above, the first two stitches of the column to be dropped are marked in red and gold. Below, the two stitches have been dropped, and the resulting ladders keep their coloration.
 |
| The first two stitches in the column have been run out |
(The above illustration shows the adjoining stitches on knitting needles, but that is mere artistic license. The stitches adjoining the column being dropped belong on stitch holders.)
 |
| The conversion begins by drawing the second ladder up over the first, as shown. |
Using a crochet hook, the conversion begins at the top of the column. Because the conversion is "upside-down" to how the fabric was created, the top stitch in the column--the red one--now appears as a giant hole, as if it were a yarn over. We'll come back to this problem shortly.
 |
| The conversion proceeding down the column |
In the above illustration, the crochet hook is pulling the next stitch out of its "right-side-up" column directly into the upside-down column, while at the same time converting the stitch from a purl (white stitch) to a knit (gold stitch). Note that the hook catches the side yarn (gold spot).
Rather than having to work a two-step process--first undoing the top stitch of the right-side-up column, then tugging the ladder of that stitch into the new upside-down column--grabbing the side yarn is a little refinement which lets you pull the next stitch out and immediately convert it--a one-step process.
 |
| Before adding the I-cord edging to the scarf, go back to the top of each converted rib. Grab the red tail with a crochet hook, twist it up and deposit it alongside its neighbors. This corrects the stitch count and eliminates the hole. |
Remember the red tail? Above is the illustration of what happens with it at the end of the work, but before you put the I-cord edging on.

Above shows the final result of the conversion, as seen from the front of the fabric. The converted purl column is upside down to the adjoining knit columns, yes, but it would take an expert knitter armed with a magnifying glass to notice it. See for yourself--the below photo shows converted purl columns in real life: this is the white and gold sample scarf before the pinstripes were applied.
 |
| The white and gold sample scarf before pinstriping, front and back, showing the converted columns. For comparison purposes, have a look at the green scarf "before" photo, where the purl columns were worked as-you-go. IMHO, both look fine, but these converted ones look "finer!" |
Good knitting!
--TK
PS: Here is a link to the Ravelry page for this pattern.