 |
| Dangling ends waiting to be worked in on the back of a stockinette fabric. Look familiar? |
But before we get to the new way, let's look at the old ways of dealing with the problem--I believe that will best show when to use the new way.
THE OLD WAYS
There are two main methods for working in dangling tails of yarn: weaving-in and skimming-in. Weaving-in is a fine old method, very well adapted to projects with both sides showing (scarves, for example.) Weaving-in is brilliant: just fine as it is.It is the other old method--the skimming-in method--which is the subject of today's update.
Unlike weaving-in, skimming-in shows. Therefore, it is used for garments with an inside and an outside. To skim in, the dangling tail is threaded onto a sharp needle. Starting near the root of the tail, the needle is pushed through the back face of the fabric, piercing through the stitches along the way, thus drawing the tail behind it. When the needle is withdrawn, the excess tail is snipped off and the part you've parked is buried, hopefully forever, in the thickness of the fabric-back. Adding a zig-zag (a change of direction) as shown, helps the tail stay buried even when the fabric is stretched and stressed.
 |
| The old way: Skimming the end (red) into the back of a stockinette fabric along a zig-zag path, using a sharp needle |
Today's post is about a new way to do skimming-in. The great thing about this new method is that it does not involve threading a needle. Instead a "knit-picker" is used to do the job faster, better and easier. And did I mention? Faster. Also? Better.
KNIT-PICKER
A knit-picker is a teeny-weenie latch hook. Its original purpose in life is pulling snags in commercial knitwear to the fabric back, there to hide: a knit-picker has saved many a snagged polo shirt to live another day. But knit-pickers can do so much more.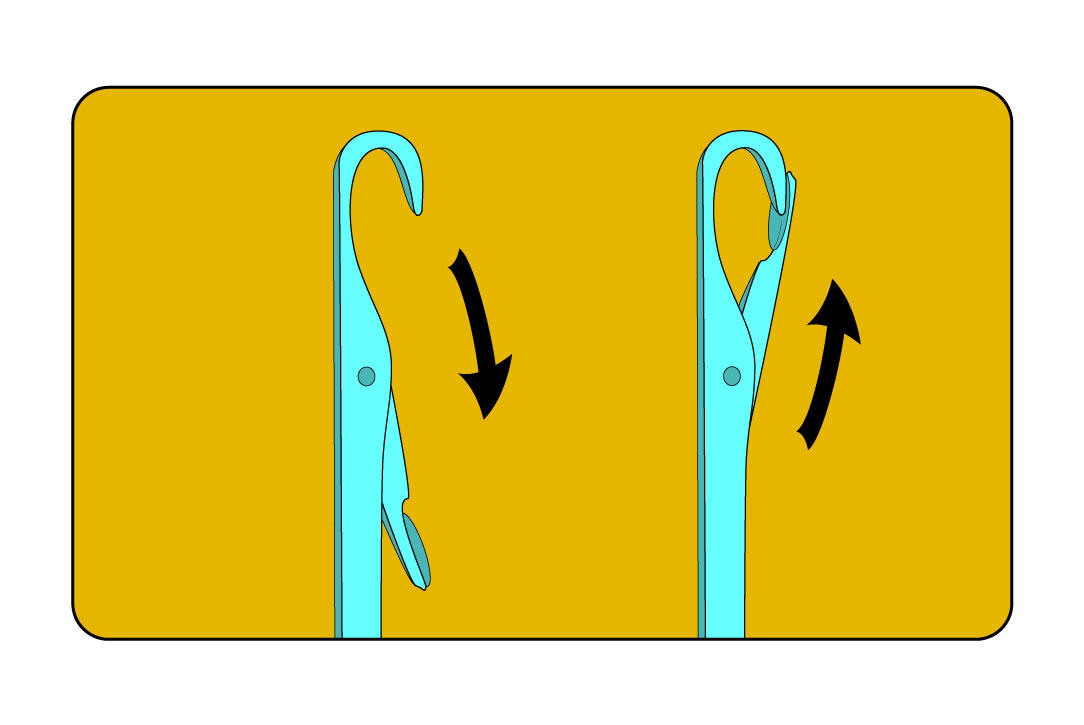 |
| Extreme close-up of the knit-picker showing the hook and latch. In real life, the hook and latch assembly of a knit-picker are very very small |
But adding loops to zippers is not the only trick a knit-picker can do. The knit-picker's ability to draw loops through fabric also lets it substitute for a needle when skimming-in ends. Yup--we now have skimming-in ends without the hassle of finding, threading, and handling, a very sharp needle. Snow White's mother can prick her fingers all she wants: with a knit-picker, those days are over!
SKIMMING-IN WITH A KNIT-PICKER
 |
| This loaded and locked knit-picker is ready to pull the tail through the fabric |
- Working from the fabric back, and holding the knit-picker's little latch-gate open with your thumbnail, insert the knit-picker into the fabric, pointing towards the dangling tail.
- Wiggle the knit-picker through the thickness of the fabric back, splitting right through the yarn of each stitch you come to. Once the knit-picker gets moving through the fabric, the little latch will stay open all by itself, so you can let go of it.
- To prevent the tail from showing on the front, as you wiggle along splitting through plies, keep the knit-picker pretty close to the surface of the fabric back.
- When you've wiggled the knit-picker's little head to a spot very near where the tail emerges from the fabric-back, shove it forward so that the hook and the latch assembly pop out of the fabric, thus exposing the hook and freeing the latch.
- Catch the tail under the hook, then latch the hook shut with your fingernail.
- Gently withdraw the loaded hook, thus drawing the tail-end through the thickness of the fabric-back. Keep tugging until the tail-end pops free. (See "geek notes" below for more info.)
I usually draw through two or three times, each time in a different direction, with the idea of really burying the tail and making it much harder for a stretch from any one direction to pop the tail loose. This is called "zig-zagging the tail." (The illustration of needle-skimming, above, shows an example of this change of direction.)
BETTER THAN A NEEDLE for SLICK or THICK
Not having to thread a needle makes skimming in both faster and easier. But where the knit-picker really shines is when it comes to burying the tails of slick yarns (acrylic, linen, cotton) or thick yarns (worsted-weight or heavier).
Work plies in separately--spiderwebbing a tail
The fibers of slick yarns (acrylic, cotton) don't want to stay parked in the fabric. The fiber is so slippery that the friction between the tail and the surrounding fabric is simply too low to hold the tail firmly. Every time the garment stretches, the end slides. Eventually it pops free in the most annoying way. Zig-zagging slows this process. Yet in a really slick fiber, even zig-zagging may merely delay the inevitable. With a knit-picker, you can go one better. Not only can you zig and zag in a different direction with each quick pull-through, but you easily separate the strands or plies of the tail, then work each individual strand along its own zig-zag. The overall effect is like a spiderweb of ends in the fabric.
 |
| Spiderwebbing with a knit-picker |
By spiderwebbing the split tail into your work, the chances of the tail popping loose is less (although some fibers--I'm looking at you, Caron Simply Soft--want to pop loose no matter what). True, you COULD spiderweb the split ends with a sewing needle, but then you'd have to thread the dratted thing three or four times. The knit-picker is so much faster that you'd be more likely (or at least, I'd be more likely) to actually do it.
In thick yarn, too, you can spiderweb the tail. The advantage in thick yarn is bulk-reduction: rather than one thick tail, you have several thinner strands radiating away from one another, all neatly buried with a knit-picker.
Easily work in too-short tails
One final trick where the knit-picker shines: if your tail is too short to thread onto a needle, the old way was to use the dressmaker's trick for threading, shown in a previous TECHknitting post. But with a knit-picker, you can work in any length of tail, even the shortest, no awkward maneuvers required.
GEEK NOTES
1) After each zig, adjust the tension of the tail in the fabric before setting off on the next zag. Zig-zagging or spiderwebbing makes it harder for the tail to pop loose, but it also makes it harder to adjust the tension at the end--best to adjust as-you-go to avoid puckering.
2) The illustration of a knit-picker skimming shows the knit-picker catching the tail close to its root, where it protrudes from the fabric. In fact, it's easier to pull the loaded and locked knit-picker back out of the fabric if you catch the tail closer to the other end--the cut-end, tensioning the loop between the knit-picker and the root of the stitch with your fingers. The illustration shows catching the root because that makes the most visual sense, but in practice, catching the tail further along reduces friction because the tail-yarn doesn't have to slide through the "eye" of the closed latch as you withdraw the knit-picker: all that has to be dragged is the (gradually shrinking) loop of yarn you are tensioning.
Good knitting --TK