Saturday, December 29, 2012

Reworking an old sweater: a job for the Garde Tricot

In classic French cuisine, one of the standard kitchen positions is called garde manger, which translates literally into "guard of the food."  Among other things, the Chef garde manger is responsible for taking significant leftovers, such as an excess of lobster, and turning it into a cold dish to be served again another day in different form.  In knitting, when a garment has come to outlive its original purpose, I think there should be a garde tricot--a guard of the knitting--who reworks the knit garment into something which can be worn again another day.

Here we have an old gray sweater, made in the infancy of my knitting career (I saw with interest that this was actually the first garment I ever made with jogless stripes

Before "garde-tricot" treatment

After "garde-tricot" treatment

Although this sweater was much worn in its day, the person-for-whom-it-was-made and I eventually parted company (but not before I got the sweater back!)  For many years, it sat in a cedar closet.  Finally the time came when another person came to want to wear it. However, in its original state, it was too long and the neckline did not suit.  

The turtleneck grew right from the
sweater top--I evidently had not yet
discovered neck shaping

This garment was knit in the round, which meant there were no seams to get in the way.  Had the garment been made in pieces, the first step would have been to undo the seams, then unravel the individual pieces as needed. (BTW?  Any garments I make with seams, I always use a different color yarn--close, but not exact--to seam with, so that I can take the seams out in some future re-styling event, without snipping into the garment by accident.)
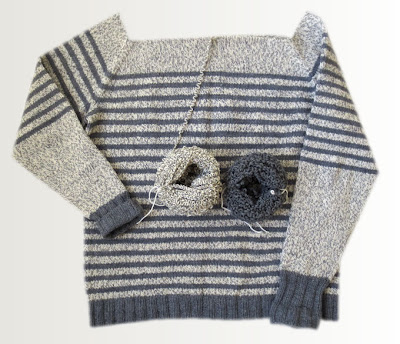

...unraveled the yarn down to the
point where the new neck edge was to begin...

The sweater was made so long ago, there was no hope of finding excess yarn in stash. The unraveled yarn therefore had to be de-kinked and re-used.  I snipped a single stitch at the edge of the neck and, as shown above, unraveled the yarn down to the point where the new neck edge was to begin. I put the loose stitches onto a knitting needle to re-knit the neck. 

Excess length being removed

At the bottom, I removed the excess length: I snipped a stitch, then unraveled in both directions, catching the stitches onto a needle.
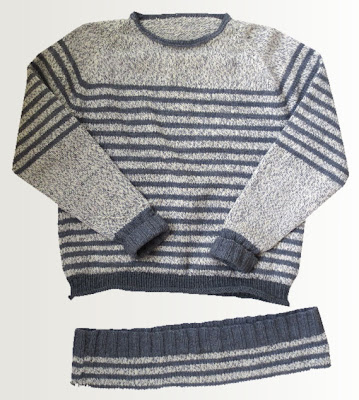
Reworked sweater before blocking

Above, you can see the new neck and new bottom band, together with the excess length, now removed.  The neck is a perfectly standard crew neck.  The back of the garment was raised by doing three series of short rows: one stretched from front shoulder seam around the back to the other front shoulder seam; the second and third stretched from the back shoulder seam across to the other back shoulder seam.  This raised the back of the garment 6 rows (just over an inch) above the front. Combined with the bottom the neck opening being lowered, the front-to-back differential supplies the neck shaping so sadly lacking in this sweater's first life.

BOTTOM BAND DETAILS
On the bottom band, I used my trick for transition zones, modified as follows:
Round 1: (first row of dark gray): knit all the way around, shown by blue stitches/arrows in illustration below--as you can see, this extra round prevented the puckering of the ribbing from traveling into the lighter stripe above the ribbing
Round 2: slip the knits wyib (with yarn in back) and purl the purls--
Round 3: Knit the knits and purl the purls
Round 4: as round 2: the elongated knits which resulted from rounds 2 and 4 are shown by the red stitches/arrow, below  
Rounds 5-12: as round 3
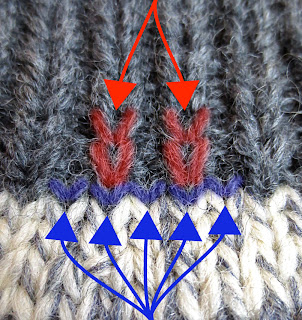
close-up of the transition zone tricks
As shown by the photo below, the ribbing was finished off by knitting around rounds 13-15, which makes a rolled-over edge for the ribbing, a trick which means that the edge of the FABRIC isn't the edge of the GARMENT)

close up of rolled edge
on lower edge of bottom band

Round 16: bind off with a chain bind off, using the "OK" alternative for the last stitch from the post about circular binds off

NECK OPENING DETAILS:
To knit the neck above the bottom of the opening, I worked around-and-back, meaning that I actually worked flat, knitting there and purling back, as shown by the below schematic--the green lines show the original circular work, the blue lines/arrow show the short rows at the neck edge. At each neck edge, rather than decreasing stitches, I held all the stitches live.  In other words, in the gray front section, I did not bind off as I worked the neck, but transferred all the center-of-of-the-neck stitches onto a scrap piece of yarn, then added additional live stitches at each neck edge as I came to them via short row, rather than binding them off. 

Schematic of neck edge showing short rows (blue)
area of live stitches (front and back, gray)
as well as edges with no live stitches (red) where live 
stitches had to be picked up, prior to bind-off

In other words, if you think about it, what I was really doing at the neck edge was knitting short rows--each of those blue rows got a little shorter as more neck-edge stitches were transferred to the holder, there to join the live stitches from the previous rows. Each time I came to the neck edge from either side to drop off more stitches onto the holder, I worked a wrap-and-turn

Once all the stitches for the neck front were decreased (ie: transferred to the scrap yarn) and the neck line finished, I had the back-of-the-neck stitches live (gray on above schematic) the front-of-the-neck stitches live (gray on above schematic) and a stretch between them (red) where the fabric edge (straight part of the curve of the neck) showed, but there were no live stitches.  Along this straight red part, where there were no live stitches, and using light gray yarn, I picked up stitches through this fabric edge at what seemed to me an appropriate rate.  I then had live light gray stitches all the way around the entire neck.  

The next thing I did was to bind off all the live stitches (including the ones I had just picked up along the red areas).  I used the dark gray yarn to do the bind off. Does it seem odd to you to purposely pick up stitches, just to bind them off?  The first reason I did it was to get a decorative and uninterrupted line of chains around the neck edge.  However, there was a structural reason, also: not only did I want to reinforce the neck edge along the back of the neck to prevent slipping, but I actually wanted to go all the way around with the reinforcement: the sweater is old, the yarn somewhat fragile, the new wearer a young adult fond of pulling at the necks of every garment worn.  I hope that a continuous bind off will help prevent horrid accidents when the neck-tugging begins. (Needless to say, the bind off was done VERY loosely, otherwise, there would be a problem getting the head through the hole.)

The wraps from the wrap-and-turn stitches were lifted off the underlying stitches and knit together with them.  The only exception is that, about a quarter of the way up the curve of the neck on both sides, instead of lifting one of the wraps and knitting it together, I used this lifted wrap as if it were a free-standing stitch.  This added a little ease along the curve.  In other words, this trick added one extra stitch at the sharpest part of the curve on each neck-side, and this was done to prevent puckering. 

As shown below, the bind off was worked so as to leave the dark gray chains showing on the sweater surface.  These chains are shown by the bottom double-headed red arrow.  I then picked up new stitches THROUGH the bind off by holding the yarn on the outside of the garment and drawing a loop UP (towards the neck hole) through the chain bind off--one loop into each chain, with the loops drawn up in such a way as to leave the entire chain exposed on the surface.  The thin red lines show the method and direction in which the loops were pulled up: the dotted portion is the part of the loop which passes through the chain, the top part of the loop is the actual picked-up stitch, the bottom part of each loop hides between the chains of the bind off.

Close-up of neck band

Once I had live stitches all the way around, I knit a short band (4 rows high) then worked a purl round to make a nice sharp fold-edge, then three additional rounds on the inside for a facing. (In the finishing process, the live loops at the bottom of the facing are pulled down so long on the inside, that you really do need at least one fewer rounds on the inside of a facing than on the outside.  Having fewer rounds on the inside of a facing also helps prevent the facing from rolling outwards).

The live stitches of the facing were tacked (sewn) down to make a hem inside the garment, using the overcast stitch: one stitch for each live loop. If you go to try this yourself, the situation seems like an impossible mess, with the inside of the facing at least twice as wide as the fabric you are trying to tack it to.  However, as you tack each stitch down, the mess lessens.  The final result, contrary to first expectation, is quite neat and tidy, as shown below. 

Close-up, inside of neck hem (facing)--the
live stitches have been sewn down with
the overcast stitch

The grand finale of the neck edge was to take matching sock yarn and adapt my "neat little edging" in slip stitch for the ribbing around the neck, matching the chains of the edging to the direction of the chains in the chain bind off. The sock-yarn edging is shown by the top double-headed red arrow two illustrations above.  Again, this was to reinforce the neck in preparation for the inevitable neck-tugging in its future, again, this had to be done loosely

FINISHING DETAILS
The last step was to wash and block the garment. I blocked it quite a bit longer and narrower, but still substantially shorter than the original.

This red towel has been washed so often,
I knew it wouldn't bleed.  However, if in doubt,
use a white towel.

In truth, if I'd had my wits about me, I would have blocked it BEFORE I knit on the new neck and bottom bands: bands don't need to be blocked and brand-new bands are delightfully elastic.  Oh well, I'll try to remember to block before knitting the bands the next time I rework an old sweater (although there are fewer and fewer in that closet, as more of the old sweaters escape).

a hole
Ooo--I'm wrong again, there was one more step: like many old garments, this sweater had developed some holes, as shown to left.  Worse, it had mysteriously become stained.  The yarn was weakened over the stained area--evidently the stains ate away at the yarn.   I spent an hour or so with a dull-pointed needle and some reclaimed yarn, duplicate stitching over the holes as well as over the stains, so that the stains did not become holes as the sweater was worn.  Also, reinforcing the stained areas made it possible to give them special attention when washing, whereas if these areas were not reinforced, the special attention would have shredded the already-weakened yarn.

Once washed and blocked, the stains lessened and the duplicate stitch flattened down.
duplicate stitch over stain
As shown to the right, only in extreme close-up can you really see where the duplicate stitching was done, and only because the garment hasn't been worn much in its new re-worked state.  Over time, even that residual uneven-ness of the columns will straighten out. A tiny bit of the stain still shows, so you can tell what it looked like before the duplicate stitch--click on photo to enlarge, stain peeks out at lower center.

Below, you can see from the inside that there were actually quite a lot of spots duplicate-stitched over (and yes, I will work in all those ends before I finally sign off on this garde-tricot project, using my new favorite method, a knit-picker.)

ends left dangling from the duplicate stitch

Good (re-)knitting--TK

Friday, December 14, 2012

Fixing brioche stitch: Dropping a ladder in brioche and half-brioche, then latching it back up again

I'm no kind of expert in the brioche stitch.  For example, I just learned the other day that what I was taught to call brioche 30+ years ago is actually a variant stitch called "half brioche."  However, as a result of a very interesting discussion on Ravelry I did get to figure out how to drop a column in the genuine brioche stitch, and then latch it back up. This would be a way to fix brioche several rows down without having to un-knit the fabric stitch-by-stitch.

Rather than reproduce all that stuff here, may I direct you to the thread on Ravelry?  Specifically of interest is a very good video (not mine) at post 27, as well as a photo-essay (by me) at post 34--both the video and the photo-essay show how to run out and re-latch the genuine brioche stitch.

Tangentially related is another series of posts (by me) in the same thread (posts 10 and 11) showing how to make half-brioche by dropping down a column in reverse stockinette fabric, then latching it back up.  Of course, if you can make half brioche this way, you ought to be able to fix it that way.  In short, posts 10 and 11 would be helpful if you're having trouble in half-brioche stitch, posts 27 and 34 would be helpful if you're having problems with the genuine brioche stitch.

Good knitting, TK

Tuesday, December 11, 2012

Dekink yarn with steam--instant results

Back in 2007, TECHknitting blog showed how to de-kink yarn, but time does not stand still.  In the intervening years, a newer INSTANT-steam method has come into use here at chezTECH.  The old post about de-kinking yarn has been updated to reflect this new trick, but it seemed worthwhile to note the update in a new post, too.  You can actually see the kinks relaxing right out of the yarn, and seeing is believing.

Important--the iron never ever rests on the yarn.  The you-tube shows 100% WOOL yarn, and for woolen yarn, you can sorta-kinda-almost touch the yarn with the iron, as shown. For non-woolen yarn, and particularly for ACRYLIC yarn, do NOT come as close to the yarn as shown in the you-tube, instead, keep the iron about an inch or so ABOVE the yarn, or you will over-steam the acrylic yarn into a rather limp state (over-steaming, alarmingly enough, is called "killing" the acrylic!)


For verrry stubborn kinks, where steam-de-kinking does not work, you can go back to the 2007 post and have a look at how to de-kink yarn the old-fashioned way, by wet-blocking, but do try this instant-steam method first!

Good knitting, TK

Friday, December 7, 2012

Shaping in the Kitchener row--useful for getting rid of the "donkey ears" on sock toes, or grafting uneven numbers of stitches together

This is part four of a four-part series on grafting (Kitchener stitching) hand knits with a sewing needle. The first three parts are already on-line (part 1, part 2, part 3).

Because this is part of a series, the numbering of the illustrations is sequential.  This post contains only illustration 9.  Illustrations 1-8 are in the previous installments.

* * *

It is possible not only to graft a seam with the Kitchener stitch, but even to do shaping. One common place this might come in handy is at the “donkey ears” on either side of a sock toe.  Another place this might be very useful is when grafting uneven numbers of stitches together.

In illustration 9, a decrease (orange) is being worked every third row on a sock toe.

The final decrease is being done on the Kitchener stitched grafting row: the first two stitches on the front needle are being worked together as a single stitch, while the neighboring stitch to the left (which would be worked next in the Kitchener stitch sequence, as discussed previously in this series) would be worked normally (as a single stitch). You would then work the first two stitches on the rear needle as a single stitch, while the neighboring stitch to the left, which is worked next in sequence, is worked normally, as a single stitch.  Obviously, the last three stitches on each needle would get a matching treatment, with the very last 2 stitches on both front and back needle worked off as one.

If your decreases are not made at the very edge of the fabric, you can just as well do this trick of working 2 stitches together as one, at any place as appropriate along the grafting row, in order to keep your decreases aligned.  However, if you're grafting socks, decreasing on the very edge of the toe as shown will eliminate the dreaded "donkey ears," because the decreases lock the (loose) first and last stitches away from the edge.

This trick of working 2 sts together as one also works when you need to graft uneven numbers of stitches together.  On the fabric with more stitches, do a decrease-while-grafting, as shown above, while on the fabric with fewer stitches, simply graft each st individually.  In this manner, you can get rid of quite a few extra stitches from one fabric while grafting it to another, narrower one.

Good luck and good knitting! TK

Sunday, December 2, 2012

Grafting ribbing without the 1/2 stitch offset--two tricks

This is part 3 of a 4-part series on grafting (Kitchener stitching) hand knits with a sewing needle. The first two parts are already on line (part 1, part 2).

Because this is part of a series, the numbering of the illustrations is sequential.  This post starts with illustration 7.  Illustrations 1-6 are in previous installments. 

* * *

Ribbing: Grafting ribbing head-to-head is problematic. You see, the head and the tail of any knitted stitch are 1/2 stitch offset. For row-structured fabrics such as stockinette or reverse stockinette, or garter stitch (row-structured = same stitch all the way down any given row) this 1/2 stitch offset only shows at the beginning and end of the graft.  In other words, in row-structured fabrics, there IS a 1/2 stitch offset, but it only shows along the very edge of the fabric, where it can easily be hidden in a seam. By contrast, in a column-structured fabric like ribbing, the 1/2 stitch offset caused by grafting live stitches head to head shows at every transition from knit to purl—in other words, at every rib. Not pretty, as you can see from the closeup in illustration 7 (red yarn = the graft).

half-stitch offset in ribbing
In truth, there is no way to actually solve this problem: it is a structural problem inherent in the knitting itself.  However, there are two pretty good tricks to disguise the offset, and those are the subject of today's post. 

First trick: the double knitting method
Ribbing and double knitting are actually close cousins. If you've ever done a tubular cast on for ribbing, you've worked a set-up tube of double knitting topped by a ribbed fabric. Same thing with a tubular bind off: that’s a ribbed fabric topped with a double-knitted tube, then grafted shut.

We can use this handy relationship to graft ribbing. The downside: it’s not stretchy. The upside: it’s easy and visually excellent--in fact, if you maintain a good tension so the graft looks like the surrounding stitches, this graft is completely undetectable--until you try to stretch the fabric, that is.

To work this trick, you re-arrange all knit stitches of the first piece onto a knitting needle, while all the purl stitches get put onto a holder held at the back. Repeat on the second piece. Here's the trick: Ignore the purls on their holders!  Instead, simply graft all the knit stitches on both needles together as for ordinary stockinette fabric.  If you already know how to graft (Kitchener stitch) great: if not, try this method using knitting needles, or this method using a sewing needle.

When you get to the end of the row, turn the fabric over, and slip the used-to-be-purl stitches from their holders (they'll now look like knits since you flipped the fabric).  Slip these held stitches onto knitting needles and again graft as for a stockinette fabric.

Although this "one-side, then the other-side" trick is not stretchy, its actually a good choice for the top of a ribbed mitten, the top of a ribbed hat or the back of a ribbed collar where the ribbing comes together head-to-head. This is also a good choice for a shoulder seam where stretchiness is not wanted. However, check the width on a swatch first: ribbing grafted this way is frozen into its fully-retracted, most 3-d position, which may be narrower than you expect.

This trick is usually used on a 1/1 (k1, p1) ribbing.  In 2/2 ribbing (k2, p2) try this on a swatch before you commit your sweater: you might think the resulting graft stiff and unpleasant. 

Second trick: grafting to a bound-off fabric
The downside of this next trick is that it’s not reversible, and not as visually good-looking as the double knitting trick. The upside: it’s reasonably stretchy, and it looks a LOT better than grafting with a 1/2 stitch offset.

This trick takes Kitchener stitch back to its duplicate stitch roots (the relationship between Kitchener and duplicate stitch is discussed in this first post of this series). However, instead of using the threaded grafting needle to duplicate the path of a fabric which could exist, here we’re going to lie with our grafting yarn, and make up a path which could never exist in real life.  This new path will disguise the offset. 

Per illustration 8, the purl and knit columns will line up with no offset.


Here's how:
  • Bind off one of the fabrics to be grafted using the chain bind off.
  • Keep the other fabric to be grafted as live loops on a knitting needle
  • Lay the fabrics on a table, the bound off one upside-down and further from you than the one with the live stitches, as shown in illustration 8. Cut the running yarn of the bottom fabric (red) to a usable length and thread it onto a tapestry needle.
  • *Thread into the first bottom loop the OPPOSITE to how that stitch lays on the needle (PURLwise if a KNIT stitch, KNITwise if a PURL stitch--if this confuses you, click here
  • Switch the yarn up to the bound-off fabric, and work the tapestry needle under the two bind-off arms of the last stitch in the corresponding column, as shown in orange on the illustration.
  • Bring the bind off yarn back to the lower fabric, to the same live loop you’ve already worked once, and thread the grafting yarn the SAME as that stitch lies on the needle (KNITwise if a KNIT stitch, PURLwise if a purl stitch).
  • Repeat from * to end of row.
In short, you're Kitchener-stitching the bottom fabric--the one with the live stitches--normally, but for the top fabric--the bound off one--you're merely inserting the needle under the bound-off arms.

You’ll note that this method grafts a knit stitch in every purl column. This is not ideal, but neither is it fatal—an all-knit row in a ribbed fabric is a common technique used to prevent the little dots (I call 'em "icky dots") which would otherwise show in the purl columns when changing colors between ribbing stripes. The results hardly show.

Don't know which trick to use where?
  • If perfection of graft is important, use the first trick--the double knitting graft.  Also, this first trick is reversible--looks great from either side.
  • If stretch is important, choose the second trick--grafting to a bound-off fabric
Good knitting, TK

Wednesday, November 28, 2012

Step-by-step Kitchener stitching with a sewing needle: stockinette, reverse stockinette and garter stitch

This is the second post in a four-part series on Kitchener-stitching with a sewing needle.


NOTE:  The illustrations are numbered sequentially across the entire series.  This post begins with illustration 3: illustrations 1 and 2 are found in the first post.

* * *


Kitchener stitch: knitting with a sewing needle

As we saw in the first post of this series, when you unite two fabrics by the contrasting-color ("cc" or "chimney") method, you are actually making a row of knitted fabric with a sewing needle. Odd but true: you’re knitting with a sewing needle. Knitting, as you know, really has only two stitches, the knit and the purl. Because it is possible to duplicate both of these with a sewing needle, this means that many different knitted fabrics can be seamed head-to-head by the Kitchener stitch, and we’ll go to fabric-specific instructions later in this post. Yet, regardless of what fabric we want to graft, there are some techniques common to most Kitchener-stitching, so we’ll look at those, first.

Set up, switching, cycle-sequence and passing

For almost all types of Kitchener-stitching, the live loops to be grafted are set up on two needles. The fabrics to be grafted are held back to back. The yarn to be used for grafting is the running yarn of the back piece, cut to a workable length and threaded onto a tapestry needle, the yarn from the front fabric is dropped and not used.

The Kitchener stitch is performed in a four-stitch cycle: per illustration 3, the four stitches are called Front-1 (F1, orange), Front-2 (F2, green), Rear-1 (R1, blue) and Rear-2 (R2, tan).

Each four-stitch cycle of Kitchener-stitching consists of a six-step sequence:
1) The grafting yarn is switched forward
2) The grafting yarn is passed through the first live loop on the front needle, F1, and F1 is dropped off the front needle.
3) The grafting yarn next passes through neighboring front loop, F2, which is retained on the needle.
4) The grafting yarn is then switched to the rear.
5) Next, the grafting yarn passes through the first live loop on the rear needle, R1, which is dropped from the needle.
6) The 4-stitch cycle ends when the grating yarn passes through the neighboring loop, R2, which is retained on the knitting needle. The cycle begins anew when the yarn is again switched forward.

In sum, the 6 steps are: switch, pass, pass, switch, pass, pass.

We’ll soon get to the details of passing (how and which way) but first, a few trouble spots to nip in the bud.
  • In your set-up, learn to hold the front needle below the rear needle. This gives a clear view of the rear loop to be grafted.
  • Regarding the cycle: every four-stitch cycle starts with a switch forward. If called away during Kitchener stitching, always work through to the nearest R2 so you’ll know where to start again.
  • As to sequence: During each cycle, F1 and R1 are dropped from their respective knitting needles. Therefore, when the cycle begins anew, the old F2 will have moved up in the sequence to the F1 position. Similarly, old R2 will have moved up in the sequence to the R1 position. This sequencing rotation has an confusing consequence, as we’ll discuss below.
  • Regarding switching: experience shows that improper switching is the number one cause of Kitchener-stitch failure. Whether switching from front to rear or from rear to front, the grafting yarn is taken around the RIGHT side of the work, in other words, UNDER the knitting needle tips. Do NOT switch over the top of the knitting needles, or you will make a royal mess. Illustration 4.


Direction of passing and the “opposite/same rule”

To emulate the action of a knitting needle, a threaded sewing needle can pass through a live loop either KNITWISE (inserting the sewing needle as you would insert a knitting needle to make a knit stitch) or PURLWISE (inserting the sewing needle as you would insert a knitting needle make a purl stitch) (illustration 5)


Kitchener stitch is based on a simple application of these two possibilities:
If the threaded sewing needle first passes through a live loop in a PURLWISE direction, and then returns in a second pass through that same live loop in a KNITWISE direction, the new stitch thus created by the grafting yarn will be a KNIT stitch.

If the grafting yarn first passes through a live loop in a KNITWISE direction, and then returns in a second pass through that same loop in a PURLWISE directions, the new stitch thus created by the grafting yarn will be a PURL stitch.

The rule to extract is that to regardless of whether you want to make a knit stitch or a purl stitch, the first pass goes the loop in the OPPOSITE direction to the resulting final stitch desired, and the second pass goes through that same loop in the SAME direction as the resulting final stitch desired.

Under this analysis, the 4 combinations of needle insertions of interest for the Kitchener stitch are:

1) First pass: INSERTING THE OPPOSITE, which means
c) insert PURLwise into a KNIT stitch OR
d) insert KNITwise into a PURL stitch.

2) Second pass: INSERTING THE SAME which means
a) insert KNITwise into a KNIT stitch OR
b) insert PURLwise into a PURL stitch


The first pass-opposite/second pass-same rule is simple, but, like many simple things, it gets complicated quickly.

First stitch, second pass; second stitch, first pass

The first thing which complicates the simple application of the opposite/same rule is the rotation through the sequence of the live loops in Kitchener-stitching.

Back in the note about sequence, we said there was a confusing consequence to the fact that, when every 4-stitch cycle begins anew, the old F2 will be in the F1 position and the old R2 will be in the R1 position.

You see, the first stitch, F1, has already received its first pass before it was promoted to its current position. In other words, back when it was in the F2 position, this loop already received a first pass before it was retained on the needle. Now that it has become an F1, it is getting its second pass prior to being slid off the knitting needle. Therefore, when we go to apply the opposite/same rule, we have to remember that even though F1 is the first stitch, it is getting its second pass. Same thing in the rear: although R1 is the first stitch on the rear needle, it is in position to get its second pass.  If you remember this, all of Kitchener stitching with a sewing needle gets a whole lot less confusing.

The zen of the stitches on the rear needle
and
the war between your eyes and your brain

This system for Kitchener stitching is based on applying the first pass-opposite/second pass-same rule. This means we must look at every stitch coming up for grafting and classify it as either a knit or a purl per illustration 6, and then work it same or opposite, as directed.

Yet, as the zen masters say, “what has a front, has a back,” and this front/back issue is the second thing complicating the application of the opposite/same rule.

In set-up, we hold the fabrics to be grafted back-to-back. If grafting stockinette, the stitches below the loops on the rear needle are going to look like purls, because we are looking at the BACK of the stockinette. So, the question arises: should these stockinette-fabric stitches be classified as knits or purls for application of the first pass-opposite/second pass-same rule? The answer is that for our system, we classify by HOW THE STITCHES LOOK FROM THE SET-UP POSITION. Therefore, the stitches on the rear needle when grafting stockinette are purls, because that’s how they look to your eye which sees the back of the rear fabric. If you sneak a peek back to illustrations 3 and 4, you will see examples: the front fabric is stockinette, and the rear fabric shows as the purls of reverse stockinette.

When you come to sort this out in practice, you may find yourself in the middle of a battle between your eye and your brain. See, your brain KNOWS you’re grafting stockinette, so it THINKS it knows those rear stitches are knits, despite the fact that, to your eye, they look like purls from the set-up position. Your brain may scream “you’re grafting stockinette, so that rear stitch is a knit, a knit, I tell you!” Ignore the screaming and trust your eye.

Fabric-by-fabric instructions for grafting by the opposite/same rule

Stockinette, reverse stockinette, ribbing grafted by the double knitting method: Stockinette and reverse stockinette look the same right side up and upside down, and from row to row. They are the easiest fabrics to graft. Ribbing will be covered in the next post of this series, but basically, when you graft ribbing by the double-knitting method (to be explained in the next post) it works the same as grafting a stockinette fabric.

The rule is: F1, same and drop it off; F2, opposite and keep it on; R1, same and drop it off; R2, opposite and keep it on.

Here it is in expanded chart form: (click illustration to greatly enlarge)

Garter stitch: Unlike stockinette, garter stitch fabric changes appearance on the fabric face from row to row, alternating rows of bumps with rows of smooth. Kitchener stitching adds a row, so you must stop knitting when the two garter fabrics to be joined lack the row that would connect them if the knitted item had been knitted all in one piece. In garter stitch, this means that both the front and the rear needles must have the same sort of row showing from the set-up position—either both must have rows of purls below the loops on the needles OR both must have a rows of knits on the loops below the needles. One additional complication: Garter stitch is a backwards application of the opposite/same rule. This is because you don’t want to make the new row you’re adding identical to the stitches in the row above and the row below. Instead, you want to make it opposite, to get the row of bumps in the right place. Therefore, for garter stitch, the rule is first pass same/second pass, opposite.

Once properly set up, the rule for garter stitch is: F1, opposite and slide it off; F2, same and keep it on; R1, opposite and slide it off; R2, same and keep it on.

Here it is in expanded chart form. (click the illustration to expand it greatly)


One last (and important!) thing

This system states that in each 4-stitch cycle, the first stitch gets the second pass-through of the grafting yarn before it is slipped off the knitting needle. This is clearly true for every cycle of Kitchener stitching except for the very first. As to that first cycle (in all fabrics except ribbing grafted to a bound-off fabric) the first F1 which is pushed off the needle has only ever had one pass—worked as a second pass. Some books seek to correct this problem with special passes done only on the very first F1 and R1. However, experience shows that this really does not make a lot of difference to the finished look. Therefore, just treat the F1 and R1 of the first cycle as if they were ordinary second-pass first stitches.


* * *

If these charts and all this theory makes you crazy, not to worry, the contrasting color ("chimney") method (shown in the first installment) works really well, is super easy and produces the exact same result.

In the next post, we'll take up grafting ribbing--without the 1/2 stitch offset (and no complicated charts, either, I promise). 

Until then, good knitting--TK

Tuesday, November 20, 2012

Kitchener stitching (grafting) with a sewing needle, the contrasting color way (also called the "chimney" method of grafting)


TECHknitting blog has shown how to graft (Kitchener stitch) without a sewing needle.  This all-knitting graft is one of the most popular posts on this site.

Today, however, TECHknitting blog is starting a retro series--going old-school to look at grafting with a sewing needle.  

  • The first post (today's) gives background on the Kitchener stitch, and shows how to graft in an incredibly simple way--the contrast color way. (When applied to sock-toes, this trick is sometimes called the "chimney method" of grafting.)
  • The second post  shows a system for grafting stockinette, reverse stockinette or garter stitch.  
  • The third post shows two tricks for grafting ribbing WITHOUT the half-stitch offset--yes it can be done! The graft isn't completely perfect, but these two tricks make grafting ribbing a whole lot better than the offset mess which usually results. 
  • The fourth and final post shows how to shape during grafting--for sock knitters, this translates into getting rid of the "donkey ears" at the corners of the toe-graft.
So, here we go, starting with...

History of the Kitchener stitch
The British general, Lord Kitchener, was concerned how his soldiers’ seamed socks maimed their toes. The smooth grafting technique which bears his name solved the problem. Today, Kitchener stitching (also called “weaving” and “grafting”) has risen far above its utilitarian sock-toe origins to become a star technique of mainstream knitting. Yet, like many stars, it has a reputation for being temperamental, difficult, or (in the case of ribbing) impossible. This series of posts present a systematized approach: step-by-step, the Kitchener stitch will be demystified, ribbing and all.


Kitchener stitch and duplicate stitch

Kitchener stitch is a sewn seam where the path of the seaming yarn follows the path a row of knitting would take. Done properly, the two fabrics are literally grafted into one longer fabric—a fabric nearly indistinguishable from one knitted all-at-once. Although it seems magical, its roots are in the humble duplicate stitch.

Per illustration 1, in duplicate stitch, a threaded tapestry needle (blunt tip, large eye) is drawn along the face of the fabric. As you see, in order to duplicate each underlying purple stitch, the red yarn must pass twice through each stitch.

Contrast-color (cc) method of Kitchener stitch

Kitchener stitch is so very related to duplicate stitch that we can actually Kitchener-stitch BY duplicate-stitching, a technique called the “cc (contrasting color) method.” Here’s how:
  • End each piece of fabric with a cc row. In illustration 2, the bottom piece has a blue cc, the top a green. These cc yarns provide a visual path for the grafting yarn to follow.
  • Bind off each piece. The illustration shows a simple looped bind-off in tan, but any bind off is OK. For ease of handling, you may choose to add a few rows past the cc row before you bind off.
  • Fold the cc rows under, then hold them close, as on the right side of illustration 2.
  • With the threaded tapestry needle (red in illustration) follow the path traced by the TOP of the blue stitches, and the BOTTOM of the green stitches, as shown.
  • When done, pull or snip out your cc yarn (the bind-off yarn will come away, also). What remains is a single length of fabric, grafted together by the Kitchener stitch. Of course, in real life, you would use a yarn of the same color to do the grafting—the red is only for illustration purposes.

Illustration 2 shows stockinette Kitchener stitching, but the cc method works for other fabrics also, such as garter stitch and reverse stockinette.

This cc method is sometimes called the "chimney method," and this is because you can work a variant of this trick to graft sock toe.  Let's say you are at the end of the sock, and the only stitches on your needles are the ones which are to be grafted together. Arrange matters so that the running yarn comes out of the right side of the back needle.  Cut the running yarn to about 10 inches and thread it onto a tapestry needle.  Let that yarn hang on the outside of the sock.

Now, instead of grafting directly, switch yarns to a contrasting color, and knit a few more rounds on the toe-stitches, going around and around with no decreasing or other shaping.  You are knitting a sort of a tube--a contrasting color "chimney."  Once you've gotten five or six rounds done, simply pull your needles right out of the work, no need to bind off, even. 

Next, tuck the chimney rounds down INSIDE the sock toe and hold the two sides tightly together.  At the very fold where the sock yarn meets the contrasting color yarn, you will be all set up to contrast-color graft as shown above.  In other words, by taking in hand the threaded needle previously prepared, and using it to follow a path along the TOP of the folded-back top cc stitches, and the BOTTOM of the folded-back bottom cc stitches, you'll have a guide for grafting, just as shown above. 

When the graft is finished, you can unravel and pick out the contrasting color chimney stitches.  What remains is a beautifully grafted toe.

The cc method is easy to understand and works great.  If you like this method, there's no reason to use any other, and you can simply skip the rest of the posts in this series.  However, for those who like theory and complication, stay tuned for the next post, which analyzes the Kitchener stitch is all its gory detail, and presents a method which works for grafting stockinette, reverse stockinette and garter stitch, too. 

'til next time --TK