Thursday, May 31, 2007

QUICKtip: check the web for errata BEFORE you cast on

(A lot of QUICKtips lately because the garden calls--I've been hoarding these short little tips up for the busy days of summer....)

ERRATA (err-ah-tah; plural noun)
Errors in printing or writing, especially such errors noted in a list of corrections and bound into a book. [Latin errātum, from neuter past participle of errāre, to stray.]

Old hands have learned this the hard way--this TECHknitting QUICKtip is for newer knitters, and was inspired by a novice knitter I overheard in my LYS last winter--asking the workers why the pattern she'd bought a few weeks earlier wasn't working. The idea that it wasn't her fault--that the pattern could be wrong--clearly shocked her.

THEN
In the old days, publishers would send out "errata notices," little strips of paper that your LYS was supposed to paste or tape into a booklet to correct the errors the publisher found out about only after the booklet was published. Similarly, when you bought a pattern book, a flurry of little errata slips often fell out as you opened the book for the first time. The publishers quaintly believed that since the error was theirs, they ought to fix it.

NOW
With the advent of the web, publishers and designers have put the onus on YOU to check their websites to see if errata have been published. It would behoove you to do that--there are pretty much no publishers immune, and magazine patterns seem particularly prone to being full of errors. Not to mention yarn company patterns.

Bottom line: check the publisher's web site for pattern errata BEFORE you cast on. Heck, check the whole web--bloggers often find problems...before publishers do...

--TECHknitter

Wednesday, May 30, 2007

QUICKtip: controlling extra-long cables

If you are working with an extra-long circular needle (like for "magic loop" or back and forth knitting) the trick of inserting your hand into the loops of excess cable will stop the cable from whipping around with every stitch, whacking everything around you.

This trick works very well with the newer flexible no-memory cables, such as with Addi Lace needles (illustrated). It works less well with old-fashioned nylon cables, but your seat mate on that next flight will still thank you.

(This is a 47" needle being used "magic loop" style to knit a hat.)

--TECHknitter

Monday, May 28, 2007

QUICKtip: Knots can be your friends

The ancient Incas are said to have communicated by "quipu"--knotted strings which encoded information. You too can encode information in a simple knot. If you knit a swatch on size 7 needles, 7 knots go in the tail. The next time you wonder what needles you used with that yarn--ta da! Your own personal "quipu" is hanging on the swatch waiting to tell you. If you "borrow" your best size 5 circular needles from a project and put the project on a stitch holder, 5 knots go in the tail. When you find that project languishing 6 months from now, you won't be discouraged from taking it up again by not remembering what you were doing--your 5 knots will remind you that you were knitting with size 5 needles. As is apparent, this also works with millimeter sizes BUT you must not mix millimeter and American sizes--pick one or the other.

--TECHknitter

Friday, May 25, 2007

How to count rows

Angie, a reader, (and a blogger who takes a nice photo) asks:
"How do I count the rows accurately in my active work? Do I include the cast-on row and the stitches on the needle(s) or not?"
A 2-part question gets a THREE-part answer...

1. COUNT THE CAST-ON?
Whether to count the cast-on depends on HOW you cast on.
  • If you cast on with a loop method (such as backwards loop or forwards loop) the first row you knit is the first row of the work--the loop cast-on is not usually counted as a row. (This is a convention because, if the cast-on were to be counted as a row, pattern writers would have to write a different set of instructions for the first repeat of a texture pattern counted in rows.)
  • If, however, you cast on with a long tail method, the first row is knitted at the time of the cast on. Therefore, the first row you knit (or purl) after the cast-on is actually the second row of the work. (There is a more detailed explanation in the long tail post.)
  • If you cast on with a cable method (also called "knitting on" or "chain cast on") then it's knitter's choice -- this kind of cast-on is heavier than a mere loop cast-on, but not quite doubled as is the long-tail cast on. You must make up your own mind.
click picture
This illustration came out small (another mystery of html). If you click it, though, it'll get bigger.


2. COUNT THE STITCHES ON THE NEEDLE?

As to whether to count the loops on the needle -- the answer is "yes." You do count the loops on the needle, because they are stitches which have already been knit. The confusion about this is understandable--it is the NEW stitches you are going to put INTO the loops already on the needle which is going to determine how those loops will lay--whether they will be knit stitches or purl stitches. BUT, because they have already been created and are laying on your needles, there is no question that the stitches on your needle have already been knit. Because they have been knitted, they ought to be counted, unless the directions tell you otherwise.

Now, having said all this hyper technical stuff, I can also tell you that one row more or less might make a horrible mess of a TEXTURE pattern in a fabric (such as this one, for example). BUT -- one row here or there is unlikely to make a difference in the FIT of any knitted garment. Whether you choose to follow the convention to exclude the cast-on row from your row count will not make a noticeable difference in your finished garment. What WILL make a difference in your fit is whether you are CONSISTENT in counting rows between the different parts of your project.

Example: suppose the front of your new sweater is knit to 76 rows to the underarm, NOT counting either row of a long-tail cast on as the first row, and NOT counting the stitches on the needle (in other words, not counting the red, green or blue rows of the illustration.) Now suppose the back is knit to 76 rows to the underarm. This time as part of the 76 rows, you DO count the rows you didn't before (in other words, this time, you do count the red, green and blue rows of the illustration.) The front piece would wind up 3 rows longer than the back. This will make for awkwardness when it comes to seaming up.

Bottom line: There is a convention for which rows to count as part of the row count. However, to achieve a good fit, CONSISTENCY in counting is the most important thing--much more important than whether you choose to follow the convention.

3. ADDENDUM:
Even though it's not part of Angie's question, the title may have readers wondering a different question. Many knitters ask: "If you want to keep track of rows as you knit them, what's the best way?"

There are lots of ways to keep track of your rows as you go--clickers of various sorts are popular, I often use the little green kind that hangs around the neck. Also popular is that hardy perennial--pencil and paper. Some knitters make hash marks on a blank page, some make Excel spreadsheets with little boxes to check off. As to the question of whether the row should be noted BEFORE starting or AFTER finishing, this is a dispute into which I will not go. As long as you are (say it with me now) CONSISTENT in your approach, it makes no difference whether you mark the row before you start or after you end.

Whatever way you keep track, however, the one certainty is that you will lose track. The phone will ring, or your kid will crash into something, or your city council rep will ring the bell to explain why she should be re-elected as you stand there wishing you'd brushed your teeth after that cheese-and-pickle sandwich. All of this is a long-winded way of saying that "reading" the fabric, as Angie wants to do, is your best insurance policy.

Have a safe Memorial Day weekend, and drive carefully!
--TECHknitter
(You have been reading TECHknitting on: How to count rows)

Wednesday, May 23, 2007

A very nearly invisible increase

Here is an increase which is as invisible as any increase can well be--the sort of increase you would do in the middle of a field of stockinette, should you ever need to do such a thing.
Step 1 (above): The green stitch is the next stitch on the left needle, the red stitch is the stitch under that. The blue yarn is the yarn of the current row--called the running yarn.
* * *
Step 2 (above): Insert the head of the right needle into the red stitch as shown.
* * *


Step 3 (above): Place the head of the red stitch on the left needle--arrange it untwisted, with the right arm forward.
* * *
Step 4 (above): With the running yarn (blue) knit the red stitch AND the green stitch.

That's it. Neat, huh?

--TECHknitter

PS:  There has been some confusion between the nearly invisible increase which ADDS a stitch to your fabric (this post above) and "knitting into the stitch below" which is a knitting trick to make a thick and puffy fabric but which does NOT ADD a stitch.  It is true that both of these techniques involve the stitch below, but they are not the same thing and confusing one for the other will cause no end of problems in trying to follow a pattern!
(You have been reading TECHknitting on: Invisible increases)

Monday, May 21, 2007

QUICKTIP: 2 kinds of sewing needles

After watching various knitters over the past several weeks stuggling to sew seams, or to work in ends, here's a TECHknitting QUICKTIP.

There are two kinds of long-eyed sewing needles which knitters are likely to meet: dull and sharp. The smaller dull ones are properly called "tapestry" needles and the larger dull ones are called "darners," while the sharp ones in all sizes are called "embroidery" or "crewel" needles.

Dull needles are used when you don't want to pierce your yarn, such as when you want to seam together the pieces of a sweater, or create duplicate stitch embroidery on the surface of a knitted fabric. LaurieM (a reader of this blog) points out in the comments that dull needles are also best for the kind of Kitchener stitch done with a sewing needle. (Thanks LaurieM!) Sharp needles are used when you do want to pierce your yarn, such as when you want to work in ends, or embroider through a thickness of knitted fabric.

Using the wrong kind of needle for the wrong kind of work will only slow things down and make you unhappy.

Addendum, December 2011:  While it is true that using the wrong kind of needle will make you crazy, here's a brand new tip from Patti in Canada--a reader who wrote in with a swell idea to avoid the need for needle switching.

--TECHknitter

Thursday, May 17, 2007

Multi color knitting, 1 color at a time: slipped stitch patterns

We've already talked some about multi-color knitting created one color at a time--a kind of knitting called multiple pass knitting. Now we're turning to the second category of one-color-at-a-time color knitting--SLIPPED STITCH patterns.

Slipped stitch patterns come in two flavors. First, simple slipped stitch. This kind mostly has a certain amount of contrast color and generous amount of the main color. The second kind are more complex patterns, often called "mosaic knitting." Complex patterns generally have roughly equal amounts of both colors.
click picture
SIMPLE SLIPPED STITCH color knitting:

A couple of decades ago, my mom made a multi-colored vest. While gearing up to write this series on color knitting, I dug it out. Mom never learned to knit with two colors at the same time, so I was curious how she'd made it. Looking carefully, that vest was made using a slip-stitch pattern--stitches from the row below (and sometimes, 2 rows below) were slipped up into the current row and left there. This created rows with two colors, although only one color was ever knitted at a time.

Below is a charted example: in this chart, row 4 is to be made by knitting the stitches shown in blue, and slipping the pink stitches indicated by the red arrows.
click picture
Step 1 of this technique involves first knitting a blue stitch, then slipping a pink stitch, then knitting a blue stitch, and so on, down the line. This is the result on the needle: the slipped pink stitches are marked with a red dot. (Below.)
click picture
Step 2: On the following row (row 5) all the stitches, both pink slipped and blue unslipped, are simply knitted. The slipped pink stitches (marked by a red dot) remain in the fabric in their slipped positions. (Below.)
click picture

* * *
Simple slipped stitch patterns are probably the easiest of all methods for creating colored knitting. However, they're nothing to sniff at. As the French philosopher Descartes implied (commentary to his third rule) when something is fine just as it is -- simple and evident -- it need not be wrapped in complications to make it seem more desirable and important.

See for yourself: this illustrations shows an super-simple slipped stitch pattern; next to it is the quite gorgeous fabric it makes.

One thing: slipping stitches distorts the fabric (bunch it up, lengthwise), so these fabrics are denser than regular one-color knitting -- sometimes a LOT denser. Good for boxy winter garments, not so good for fitted summer clothes.

One more thing to take into account: if you want to make two color slipped stitch fabrics working back-and-forth, it will sometimes happen that your two colors of yarn will wind up on opposite edges of the fabric. This is more of a surprise than a problem--the solution is laid out in the green paragraphs about "out of phase yarns" in this post (scroll down for the green text).

COMPLEX SLIPPED STITCH color knitting:
The simple slipped stitch fabrics illustrated above usually involve slipping a few contrast stitches over a ground of main color. Complex slipped stitch patterns are made the same way--by slipping stitches of one color on the first pass, or the first several passes, then knitting these slipped stitches on a future row. However complex patterns differ from simple patterns:
  • they are generally geometric
  • they generally feature rather equal amounts of both colors
  • the stitches are more frequently (but not always) slipped over more than one row.
Complex slipped stitch patterns knitted in motifs are often called "mosaic knitting" and their most famous proponent is Barbara Walker. Ms. Walker's book by that name was recently re-issued by Schoolhouse Press, (Thanks, Schoolhouse!)

Mosaic knitting--whether in motifs or in all-over fabric--creates a firm, not very stretchy fabric, more like fabric woven on a loom than fabric created with knitting needles. (This is because the high number of slipped stitches take most of the "reserve" out of the normally loopy knitted stitches--more info at this link.)

All-over mosaic fabrics; heck, any mosaics, have a retro look. They are rather thick and heavy -- best for outerwear or sleeveless garments. How 'bout this dapper gent's vest pattern from Vintage Purls? (VP, posting from Kiwiland--New Zealand --collects vintage patterns and puts them on the web for free. Thanks VP!) How 'bout those colors in the fabric sample knitted from the pattern? 70's appliances, no?

Heads up: sock patterns are sometimes written in mosaic patterns, but even in thin yarn, they'd be pretty stiff and thick--more hiking than dress up.

--TECHknitter (You have been reading TECHknitting on: Slipped stitch color knitting)

Sunday, May 13, 2007

QUICKTIP: How to see if socks will fit without trying them on

On mother's day, I will channel one of my own mother's tricks for you--a trick for figuring out whether socks will fit without actually trying them on. It works on the principle that people's hands and feet are in proportion.

Top photo (opposite)
Have the sock's Intended Wearer (IW) clasp the toe of the sock between thumb and hand- grasping as little of the toe as possible.

Bottom photo (opposite) Make a fist, then wrap the sock all way around the hand. You are aiming to get a foot length so that the heel will slightly overlap the toe.


If the heel does slightly overlap the toe, the sock will fit that person.

It is true that when in the process of knitting socks, there is not yet a toe to clasp (or, if making them toe up, there is not yet a heel to measure against.) Nevertheless, you can adapt this principle to "try on" socks without sticking your (or another's) feet into a nest of sharp and poking dpn's. The thing to do is to "guesstimate" based on having the IW clutch the sock by the needles, then wrap the already knitted part of the foot around the IW's fist. Don't forget to factor in the toe (or heel) length. The size of the gap reveals the amount of foot still left to knit.

This is also a great trick for "trying out" gift socks without revealing what you are making--have the IW shut their eyes (no peeking) and wrap away--if the IW thinks anything, they will think you are knitting them mittens.

A mother's day thought: trying on mystery garments is very intriguing to little kids--they love the drama of "no peeking!" I fondly remember my mom and grandmom doing mystery try-ons for my sister and me--mostly dresses, but sometimes knitted garments--it is one of my favorite childhood memories. Afterwards, my sister and I would speculate on what those garments could possibly be...

--TECHknitter
(You have been reading TECHknitting on: making socks that fit.)

Saturday, May 12, 2007

Multi-color knitting, one color at time: multiple-pass color knitting

This TECHknitting series on color knitting (color knitting is also called "stranded knitting") is now taking a 180 degree turn: leaving behind the perhaps slightly intimidating techniques covered in the most recent color-series posts (link 1, link 2) for a much EASIER technique.

With this trick ANY knitter, regardless of skill level, can lay down any number of colors with no skills other than ordinary knitting--yes, any color pattern, regardless how complicated. All that is required is a basic knowledge of knitting and PATIENCE.

This trick is called...

Multi color knitting, one color at a time

There are two kinds of multi-color knitting, created one color at a time. The first kind is called multiple pass color knitting, and it is the subject of today's post. The second kind is called slipped stitch color patterns--those are tackled here.


MULTIPLE PASS KNITTING
Multiple pass knitting creates "ordinary" color patterns. By "ordinary" color patterns, I mean patterns which do not have any slipped stitches in the final result--as in the opening photo. Just to confuse you, though, creating "ordinary" patterns in multiple-pass knitting requires you to slip stitches during the construction phase. However, no slipped stitches remain in the finished fabric.

The upside of this trick is that it is nothing other than regular knitting (and perhaps, purling)--however you prefer to do it (continental or English). Beginners can use this trick to do two- (or more!) color knitting without tension problems. In the simplest form of this technique, multi-color effects are created by multiple passes through each row--two passes (once with each color) for two color knitting, three passes for three color knitting, etc. This opens a whole world of color patterns without having to learn any new technique at all. With all this upside, you know there is a downside, and the fact is that multiple pass knitting is S-L-O-W.

The explanation and illustration of this trick, below, shows a simple two-color, one-row pattern, but once you understand the example, multi-colors spread over multiple rows (as in the opening photo) are worked the same way.

click picture
At heart, this trick is very simple. In this example two color knitting is accomplished in two passes through row 4--the only multi-colored row of this particular pattern. In other words, row 4 will be constructed in two passes--The first pass will lay down row 4's blue stitches, the second pass will lay down row 4's pink stitches.

click picture
(Above) multiple-pass knitting must be done on some sort of two-pointed needle: a circular or double pointed needle. This is one trick where needles with knobs simply will not work. For right now, we'll always knit on the face of the fabric (the "right" or "knit" side) as illustrated above.

click picture
(Above--step 1) On the first pass-through, you KNIT every stitch of the first color (in this example, the blue stitches) and SLIP up from row 3, every stitch which is to be knitted in the second color (pink). ("Slip up from row 3," means that when you get to a stitch which is not supposed to be a blue stitch, you simply slip that stitch from your left needle to your right needle, without knitting it, AND without twisting it--you slip it "open" or purlwise.) At the end of this first pass-through, the row is only half-knitted.

For the second pass-through: if you are working flat (back and forth) on double pointed needles (dpn's) or back and forth on circular needles, you then push the whole work back along the needle and start again with the right side facing you--no need to purl back. If you are working a tube with dpn's or circular needles, you simply go around on the face of the fabric again, this time using the other color.

click picture
(Above--step 2) On this second step (the second pass through row 4) you use the second color (pink) to KNIT every stitch you slipped on step 1, and SLIP every stitch of the first color (blue) which you knitted on step 1. At the end of steps 1 and 2 you will have knit an entire row with two colors, using only one color at a time. In other words, after step 1, the blue stitches will have been knitted, then slipped; after step 2, the pink stitches will have been slipped, then knitted.

At the end of two passes, this 2-color pattern is done. NO stitch will remain in the slipped position--if any stitch remains in the slipped position, you haven't done this technique right (although you have, perhaps, independently discovered 2-color slipped stitch patterns!)

Circular knitting, flat knitting and out-of-phase yarns.

For your first project, you will find it easier to work a tube on circular needles or dpn's. This is because a tube made in multiple-pass color knitting, like all tubes, requires you to work only on the knit face of the fabric--you never have to turn the fabric and purl back. The second pass through the same row in multiple-pass knitting requires only that you switch to the next color of yarn and work your way around the tube again to the starting point (which you surely have marked with a stitch marker!)

If you ARE making a tube (circular knitting), you get to skip all the green paragraphs--skip down to "tension." If you want to knit flat, though, you have to slog though further explanation.

If you are creating flat knitting (working back-and forth on double pointed needles or circular needles), a strange situation will arise--your yarns will get "out of phase," they will wind up on opposite edges of the fabric.

To explain: In the color pattern of the example (first illustration above) there are 4 rows of knitting. Rows 1, 2 and 3 are all pink, row 4 is the color-knitting row. At the end of one repetition of our 4 row pattern, both the yarns (pink and blue) are at the left, "ready-to-purl" edge of the fabric.

In flat (back and forth) knitting, the second set of 4 rows will go like this: Row 1 is all pink--and you'll purl back. Row 2 is all pink, and you'll knit. Row 3 is all pink and you'll purl, Row 4 is color knitting, and is a little confusing as to whether you knit or purl, because your blue yarn is on the left edge of the fabric where you parked it after the first repetition of the pattern--it is on the "ready to purl" side. However, the pink yarn, which has been worked an additional three rows, is on the right edge of the fabric--the "ready to knit side." In other words, the yarns are at opposite edges of the fabric! They are out of phase with one another.

However, as odd as this is, this is more of a mental challenge than anything to actually worry about. Multiple-pass color knitting lets you lay down the two colors independent of one another. Therefore, on this first half of row 4, you are first going to PURL in blue, and you are going to SLIP every non-blue stitch from the purl side. Be sure to hold the float yarn (the "tail" loops connecting the blue stitches) on the purl side of the fabric--the side facing you, and be sure to slip the loops of the slipped stitches "open" (untwisted--purlwise). When you finish the row, your yarns will be at the same edge, and you'll now create the second half of row 4 by KNITTING the just-slipped stitches in pink, while SLIPPING every blue stitch "open" (purlwise). You see-because the yarns are laid down independently, it does not matter if you have to create the passes of knitting from opposite edges of the fabric--it's just a little test to keep you on your toes!

Tension and floats
As with any other kind of two-color knitting, you must stretch out the floats (strands behind) far enough so that the fabric will not pucker. However, this is easier with this sort of color knitting than with any other technique--just be sure to S-T-R-E-T-C-H the slipped stitches all the way out along the right needle before knitting (or purling) the new color--if you bunch up the slipped stitches on the right needle, the float will be too short when the formerly bunched-up stitches come off the right needle and spread out. Also, as with any other kind of color knitting, it is best to avoid floats which exceed 5-6 stitches. (For more background information on color knitting, click here.)

Addendum, November 2015:  Poking around on the internet, I found a You-Tube video from a lady named Eliza, who evidently independently "unvented" multiple-pass knitting.  (Unventing, a great word coined by the great knitter, Elizabeth Zimmermann, arises when you have a new knitting thought which is really not new, but comes to you in the night, floating down from the ether to land in your head.) Anyhow, the point is, the you-tube has a good solution for the tension issue, and that is, to use yarn overs to put slack where you need it. So, if stretching the slipped stitches isn't giving you the slack you need, have a look at this video, and see if you like the YO idea.

A note to advanced knitters: Although this usually thought of as a beginner's trick, even advanced knitters can use this trick to advantage. I have never been able to efficiently knit any more than three colors on any row. Any time there are more than three colors in a row, this trick gets trotted out. On two go-throughs, you can get up to 6 colors of a fancy pattern--laying down up to three colors the first go through, then up to three again on the second pass. (If you get past 6 colors on one row, I suppose you could always take a third pass through, although if you're writing patterns like that, you should take a job as a choreographer--your local dance company needs you.)

Some rows in the fabric of the opening illustration were knit in one or two passes per row, two colors on the first pass, two colors on the second--but such is the flexibility of this trick that other rows were knitted regulation style with one pass per color.

Final note: The color pattern in the opening illustration was adapted from the book "Knitted Tams" by Mary Rowe.

--TECHknitter

Tuesday, May 8, 2007

An easier way to Kitchener Stitch (also called "grafting seams" or "weaving seams")

includes a how-to
click picture
Lord Kitchener, a British general, was concerned about the state of his men's feet--their sock seams rubbed their toes bloody. Accordingly, he invented (or more likely, IMHO, he had an expert knitter invent, and then took the credit for) a way to finish off socks smoothly. This toe-ending maneuver is now called the Kitchener stitch. Other names for this maneuver are: "weaving" or "grafting" seams.

Kitchener stitch makes a very lovely ending--a sort of optical illusion that the knitting just kept going "around the corner." Without the red yarn picking out the weaving for you to follow (little picture) the seam in this sock toe would be completely invisible (big picture). Kitchener stitching is most often used for sock toes, but is sometimes used to graft other "live edges" together.   Have a look at this high-fashion garment which uses large amounts to Kitchener stitching to close the long seams at the top of dolman sleeves.

Now, the thing about Kitchener stitch is that it is usually done with a tapestry needle and a length of yarn, and typically terrifies knitters, being considered an "expert" skill. The needle goes in and out of the live stitches, following the complicated path that a row of knitting would take, and this accounts for the invisibility of the seam--the fabric is actually grafted together with a seam which is structurally identical to the fabric--in fact, Kitchener stitch is a form of duplicate stitch, when you get right down to it.

click picturebe my guinea pig?
MAKING IT EASIER

For some time, I have been nursing the theory that maybe the reason why some knitters avoid Kitchener stitch is because it is actually a species of sewing. It is my theory that if it you didn't have to dig out a tapestry needle -- if it could be done with knitting needles -- Kitchener-o-phobic knitters might find it more attractive.

After a bit of messing around, this new unvention has emerged--a way to graft seams shut with knitting needles. This TECH-unvention is now ready to spring upon the world.

This post asks you, dear readers, to fill the role of guinea pigs. My fellow blogger, kmkat, was the first guinea pig--she graciously volunteered to be a test-knitter before this post was ever published, and she found that the instructions worked for her. Now, perhaps you will try these instructions out for yourself and see whether you like this new method.

Like the traditional sewing method, this new way is still done with a length of yarn pulled through the loops, but the "stitches" are real knitting stitches (knit and purl) not sewing stitches, and the work is done only with knitting needles--you can leave the tapestry needle in the cross-stitch kit, where it belongs.

SET UP

click picture
K st set up
When you have finished the toe of a sock, you must set up your work as follows: arrange all the front (instep) stitches on one double pointed needle, and all the back (sole) stitches on another double pointed needle--in the instructions which follow, these two needles are called the left needles, both front and rear. The yarn should be coming out of the last stitch on the rear needle--in other words, by the right hand end of the rear left needle, as illustrated above.

For a typical sock toe, about 15 inches of yarn will be more than enough--cut the yarn to that length. This 15 inch length of yarn (illustrated in red, above) is the "working yarn." The work is actually done by manipulating this working yarn, using a third double pointed needle, the "right-" or "working needle." To complete your set-up, you must take this working needle into your right hand, while holding the two left needles in your left hand.

A final note before beginning: Although this method is done with knitting needles, it is different than knitting because it is done with a CUT LENGTH OF YARN--which we are calling the "working yarn." Instead of making endless loops, you are going to do something unusual with your knitting needle--you are going to use it to draw the working yarn ALL THE WAY THROUGH each loop each time. If you look at the illustrations below, you will see that the working yarn (red) passes AS A SINGLE STRAND, through the stitch being worked. In other words, with each of the 4 steps listed below, the working yarn is to be pulled all the way through the stitch until the end of the working yarn has popped free, as illustrated.

HOW TO KITCHENER STITCH with
KNITTING NEEDLES
Step 1:
click picture
K st step1
Wrap (bring) the working yarn around to the front of the work.  NOTE that the working yarn passes UNDER the two left needles, and UNDER the right working needle.  Insert the right working needle into the first stitch (green) on the left front needle, and use the working yarn to PURL this first stitch. Draw the working yarn backwards (away from you) all the way through this stitch until the end of the working yarn pops free. The loose end of the working yarn (red) will now be in the area between the left needles. The stitch (green) which you were working is now fully bound off.  Push this stitch off the left front needle.

Step 2:
click picturek st step2
The working yarn should now be in the area between the left front and left rear needles. Insert the right working needle into the next stitch (purple)--which is the second stitch on the left front needle. Use the working yarn to KNIT this stitch. Draw the working yarn forward (towards you) all the way through this stitch until the end of the working yarn pops free of the stitch. The loose end of the working yarn (red) will now be in the front of the work. The stitch (purple) you were working on is only half bound off--you must leave this stitch on the left front needle.

Step 3:
click picture
Wrap the working yarn around to the back of the work. NOTE that the working yarn again passes UNDER all the needles on its trip to the back of the work.  Insert the right working needle into first stitch on the left rear needle (blue) and use the working yarn to KNIT this stitch. Draw working yarn forward all the way through this stitch until the end of the working yarn pops free. The loose end of the working yarn (red) will now be in the area between the two left needles. The stitch (blue) you were working is fully bound off--push this stitch off the left rear needle.

Step 4:
click picture
The working yarn should be in the area between the left front and left rear needles. Insert the right working needle into the second stitch on the left rear needle (teal) and use the working yarn to PURL this stitch. Draw the working yarn backwards all the way through this stitch until the end of the working yarn pops free. The loose end of the working yarn (red) will now be at the back of the work. The stitch (teal) you were working is only half bound off--you must leave this stitch on the left rear needle.

These four steps are repeated again and again to create a Kitchener stitched seam. If you want to chant the steps to yourself as you work, here is the mantra:
  • Step 1: Purl front, push the stitch off
  • Step 2: Knit front, leave the stitch on
  • Step 3: Knit rear, push the stitch off
  • Step 4: Purl rear, leave the stitch on
(When my kids hear me chanting like this, they know to stay away until the muttering ceases.)

TENSION and SPEED
Resist the temptation to give the yarn a good yank as you pull it through. Instead be mild in your adjustment--remember, as you're drawing the working yarn through the stitches, you don't have a knitting needle around which to form your loop. Therefore, if you want your Kitchener stitch to look like the rest of your fabric, you must leave enough extra slack to approximate the loop the working yarn would otherwise make around a knitting needle. Some instructions have you adjust the tension at the end, but that is really only possible with a smooth yarn over a short span. The hairier your yarn or the longer your span, the more it pays to learn to adjust the tension as you go.

This work goes MUCH slower than you expect, because each set of 4 steps only re-creates what amounts to 1 knit stitch. In other words, even if you could do this as fast as actual knitting, it would take four times as long. Since Kitchener stitch actually takes a good deal longer than actual knitting, progress seems glacial. Persevere, however, and you will have lovely toes (or at least, your socks will).

--TECHknitter You have been reading TECHknitting on: A new way to Kitchener stitch, also called "grafting seams" and "weaving seams."

Saturday, May 5, 2007

Half a candle!

Little kids enjoy "half birthdays," and since my blog is still a little kid, today's that special day. TECHknitting is 6 months old!

Thank you readers

And, let me add: "Merci," "Danke," "Mange Tak," "Jolly good of you!" "Thanks, mate," "Gracias," "Dank u," "Grazie," "Obrigado."(For further messages in different languages, look at the bottom of this post.)

A recently commissioned survey found that you folks come from all over the world! Czech Republic, Singapore, Germany, France, Spain, Denmark, Japan, India, England, Brazil, Ireland, Holland, Chile, Turkey, Korea, Venezuela, Poland, Portugal, Belgium, South Africa, Bosnia & Herzegovina, Estonia, China, Italy, Hong-Kong, Scotland, Croatia, Malaysia, New Zealand, Israel, Sweden, Australia, Thailand, Egypt, Hungary, Ecuador, Romania, Norway, Honduras, Bermuda, Kazakhstan (I'm not kidding...) Iran, Mexico, Switzerland, Finland--more than 50 countries and counting...did I miss anyone?

And Canada (O Canada!) From Nova Scotia and St. John's to Vancouver, with many, many stops in between (hello Toronto, hello Montreal), and as far into the True North as the wilds of Alberta. Living in the "northern tier" in the state of Wisconsin, I never forget that Wisconsin is "down SOUTH" to you folks. Yowsa, you are tough.

Closer to home, hello to readers on both US coasts, from downeast in Maine, through Noo Yawk and Noo Joisey to islands off the coast of Washington state, and even Alaska, with many, many points in between--from thriving metropolises (metropoli?) to places I never heard of before. Surprising to me are the lots of readers from places I thought were too HOT for knitting (Georgia, Texas, Southern California, Alabama, Florida). Guess I don't know much...

Thanks to all of you guys for reading, and thanks also for all your lovely comments. When pounding Adobe Illustrator in the wee hours, I sometimes go back and read your comments to take heart.

I'll finish with big thanks for something else. Isela of Purling Sprite recently honored TECHknitting by nominating this blog for a "thinking blogger" award. In order to actually claim the award, I'd have to nominate another 5 blogs. I've tried to do it, I've made lists, I've gone back and read the archives of many blogs on the computer. However, in the weeks since Isela's lovely nomination, it's become apparent that it's impossible to parse it down to 5--there are too many great blogs. The finished garments, the lovely yarns, the inspirational stories, the countdown clocks, the jogging goals, the KAL's, the Dulaan knitters, the teaser pictures of "surprise" gifts on the needles, the goofy cat photos, the question boards, the heartbreak, the perseverance, the forums, the whole knitting blog-o-verse...it's just too difficult. You guys rock.

Thanks to Isela, and thanks to you all.

--TECHknitter

GERMAN: Ein herzliches Willkommen wird den deutschen Lesern angeboten -- meine Mutter war in Berlin geboren, und bis jetzt, sprechen wir immer noch Deutsches im Haus. Wenn Sie sich interessieren, dieses blog auf Deutsch zu lesen, können Sie den Service entweder von “Google Translate” oder AltaVista "BabelFish” verwenden. Sie müssen das URL dieses blog (TECHknitting.blogspot.com) in den korrekten Bereich einfach eintippen, und die Übersetzung wird schnell, (auch wenn nicht immer so genau) durchgeführt.

FRENCH: Bienvenue aux lecteurs français! Trois ans je suis allé à l'école dans la région française de la Suisse. Mon mari a étudié le français à l'université. Si nous voulons dire à des secrets ce que les enfants ne peuvent pas comprendre, nous parlons français (très mauvais). Si vous vous intéressez lire ce blog en français, vous pouvez employer le service de "GoogleTranslate" ou d' "AltaVista BabelFish." Vous devez saisir le URL de ce blog (TECHknitting.blogspot.com) dans le secteur correct, et la traduction sera effectuée rapidement (bien que peut-être non 100% exactement).

SPANISH: Hola a los lectores españoles! Si usted desea leer este blog en español, usted puede emplear los servicios de "GoogleTranslate" o de "AltaVista BabelFish." Escriba en el área correcta, el URL de este blog (TECHknitting.blogspot.com) y habrá una traducción (aunque quizás el no 100% exacto).

PORTUGESE: Boa vinda aos leitores de Portugese! Se você quiser ler este blog em Portugese, você pode empregar os serviços de "GoogleTranslate" ou de "AltaVista BabelFish." Escreva na área correta, o URL deste blog (TECHknitting.blogspot.com) e haverá uma tradução (embora talvez não 100% exato).

DUTCH: Onthaal aan Nederlandse lezers! Als u dit blog in het Nederlands wilt lezen, kunt u de dienst "GoogleTranslate" tewerkstellen of "AltaVistsa BabelFish" u kan URL van dit blog (TECHknitting.blogspot.com) in het correcte gebied schrijven, en blog zal snel vertaald worden (hoewel zeker niet nauwkeurige 100%).

Wednesday, May 2, 2007

Knitting with two colors on one hand AND three color knitting (part 3 of the color knitting series)

This post is the third in a TECHknitting series.  The others in the series are:
Part 1: How to knit with two or more colors: background information


This third post in the series covers how to knit with 2 colors on one hand, and
the (highly) related issue of how to knit with 3 colors. We'll also look at
various tricks to make 2 and 3 color knitting come out better.

As with everything else in knitting, there is more than one way to do a thing. This post is about knitting with two colors off the left hand--continental style and knitting three colors carrying two colors in the left hand, continental style, then adding a third color with the right hand knitting English-style. This is my method because I have never been able to work out how to carry more than one color on the English hand (right hand). If anyone is able to say how they knit two colors off the right hand at the same time, English style, oh please write: I'd love to hear about it.

TWO COLORS ON ONE (the left) HAND

There are two broad variations on carrying 2 colors of yarn on the left hand. One way is with gizmos, and the other way is by arrangement of the fingers. The gizmo category is dominated by two kinds of "strickfingerhut" (a Germanic word translated literally as: "knitting finger-hat", by which is meant "knitting thimble"). There is an excellent tutorial in how to use them here. I can't shed further light, I don't use them. I do know here are testimonials on the web about how these gizmos have made color knitting possible for many, so if finger arrangement isn't working for you, check these gizmos out.

The second method is to carry two colors on the left hand by separating them somehow--I use my thumb as in the picture below, but there are other methods--I have seen a knitter carrying one yarn over her forefinger, and the other color over her middle finger.
click picture
By turning my thumb this way and that, I am able to "pluck" the correct yarn into the pick-up zone for the right (working) needle to grab.
click picture

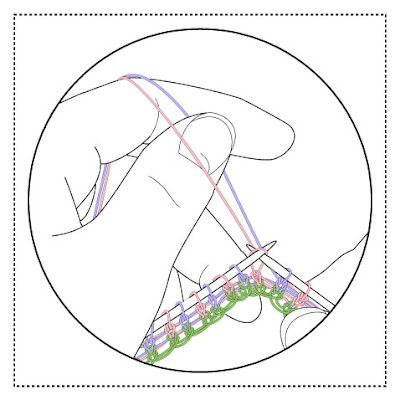
Whether with strickfingerhutten or with finger arrangement, the idea is the same: to separate the yarns so the correct one can be plucked, while also keeping the yarns under tension. This means that tricks which work for one method can also work for the other.

TRICKS

A great first step towards easier two color knitting is to find a pattern which uses about the same amount of each of the two colors of yarn. In other words, you want to be able to feed both colors of yarn at the same rate. If you are attempting to feed yarn at different rates, you'll keep having to stop and re-tension and this is going to slow you down.

click picture
To explain: A pattern like "A" feeds yarn at two different rates: there are 2 stitches of blue color for each stitch of pink. Twice as much of the blue as of the pink must therefore pass through your left hand. The blue and the pink are held together in the hand--they are not separated until the very last part of the knitting process, when they pass on either side of a thumb, or through the loops of a strickfingerhut. This means that every stitch of blue is tugging along bit of pink and vice versa. But with twice as many blue stitches as pink ones, much more pink yarn is being tugged along than will be knit into the pattern.

In other words, knitting two yarns off one hand using a pattern with different feed rates has a tendency to bad tension. Correcting that tendency by pulling back on the pink yarn every few stitches overcomes the slackness problem, but that readjustment slows you down.

click picture
A pattern such as "B" feeds the two colors at the same rate: There are 2 stitches of blue for each 2 stitches of pink. It is true that after the second blue stitch, the pink yarn will have been tugged along twice, which slackens it. However, this extra pink yarn will be speedily knit up in its turn--it won't be building up ever-greater slack around the left needle tip, and causing tension trouble, or requiring continual readjustment, as in pattern "A."

click picture
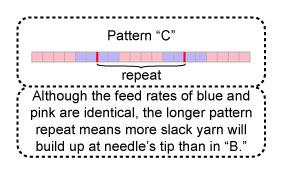
As is evident, a pattern such as "C" is going to be harder to knit with proper tension than "B." It is true that pattern "C" feeds both yarns at the same rate BUT the pink has been tugged along 4 times by the time each blue repeat is completed (and vice versa). This is quite a bit of slack yarn to have built up, and the danger is that the first stitch of any color will be looser and slacker than the remaining three stitches, because there is more slack yarn hanging around during its formation than during the formation of the following three stitches. When you add to this danger, the the need to carry the yarn loosely in the float, it is obvious why carrying two colors on one hand goes faster and easier with a same-feed, short float pattern than otherwise.

click picture
Even if you do pick a pattern with a short repeat, short float and even feed rate like pattern "B," above, you're still not home safe. So far, we've only considered the horizontal arrangement of color knitting -- the easiest way to lay stitches down next to one another in the same round. However, successful fabric construction, requires addressing the vertical aspect of multi-colored fabric, too.

A pattern which carries the same colors along the same lines for a considerable distance up the fabric isn't easy to knit at a proper tension. This is because the floats rise to the surface of the fabric between the same 2 columns of stitches, as in the middle diagram, opposite. The yarn consistently rising to the surface from the back between the same two columns forces the fabric to break into a ribbing-like texture pattern, and this is true even if the floats are perfectly tensioned and the basic pattern follows all the rules for a good horizontal pattern, such as pattern "B" from above.

The solution is to have the floats surface between different columns in every round, or nearly every round (my own rule is not to knit more than 4 rounds with the same color-break). The best fabric is when a good basic horizontal pattern like pattern "B," above, is worked into a pattern like one of the four bottom diagrams--a pattern which is also going to work vertically--by staggering the color changes across different columns.
* * *
What a lot of limitations there are on knitting 2 colors off one hand--short floats, even feed rates, repeats staggered across columns of stitches! When you compare this sort of rule-bound knitting to knitting one color off each hand, as shown in the previous post, you'll conclude (or at least, I'll conclude) that knitting one color off each hand is the more flexible method. With the two colors separated, different rates of feed are easy to accommodate--the yarn in the left hand does not tug along the yarn in the right hand because "never the twain shall meet." It is true that you still have to follow the rule of arranging to stagger your color breaks across different columns, but with different feed rates, the two colors of color knitting are less likely to wind up in the same columns to begin with. In other words, with "two-fisted" knitting comes the freedom to use vastly different feed rates, and far fewer restrictions in creating a viable, even-tensioned fabric.

So--with all these disadvantages, why would anyone want to learn to knit two colors off one hand?  That is a good question! Now we are slowly coming to the heart of today's post. The answer is, knitting two colors off one hand turns out to be particularly useful when we come to three-color knitting.

THREE COLOR KNITTING

Although common wisdom says it's best to stick to two colors at any one time, the fact is that a surprisingly small amount of a third color--a highlight color--really perks up a two-color pattern.
click picture

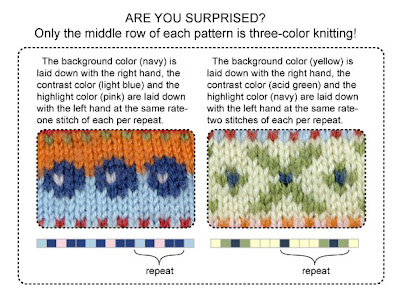
IMHO, the very best and easiest sorts of 3-color patterns are those where the background color predominates, and the contrast and highlight colors appear in much smaller amounts. In this situation, the background color (main color) is laid down at an independent rate of feed with one hand (the right hand, English style). The contrast color and the highlight color are laid down with the other hand (left hand, continental style) at the same rate of feed as each other (and THIS is where 2-colors-off-one-hand knitting comes into its own--in laying down the contrast and highlight colors). The photo above shows two such patterns, and shows how surprisingly effective a very small amount of a third, highlight, color can be in setting off what is essentially a two-color pattern.

To clarify further: in both of the patterns in the above illustration, there is a great deal more of the background color, and that is laid down, at its own independent rate of feed, by the right hand, knitting English style. The two contrast colors--the usual contrast color, as well as the third "highlight" color, are laid down with the two-colors-on-one hand method, laid down at the same rate of feed as each other, and knitted off the left hand. The zing added by a third color in even moderate amounts make worthwhile the whole ordeal of learning to knit two colors off one hand.

BTW--The color patterns in the close-up illustration photo are adapted from a chart in a Dale of Norway booklet, #152, which has a pattern for a baby sweater using these colors and patterns worked in fingering weight yarn. If you are looking for a printed pattern to follow this would be a good one--I find color selections are intriguing, but if you don't, these could be changed--but the real point is that the construction of the color repeats make excellent mechanical sense. The little sweater in the pattern book is steeked, but if steeking is not on your to-do list, or if a baby sweater is not, this color knitting pattern can be adapted to a hat.

--TECHknitter

You have been reading TECHknitting on: How to knit with 2 colors on one hand AND how to do three-color knitting (Part 3 of the how to knit colors series)